Awesome Window Manager: Part 3
In part three of "ricing" the Awesome window manager, we'll look at adding a "run launcher" called "Rofi" and "hotkey daemon" called "sxhkd". We'll also create an "AutoStart" script, which will allow us to launch applications, scripts and system tray applets when Awesome starts up.
Simple X Hotkey Daemon
I normally leave the hotkeys for controlling my window layouts to those set in rc.lua. However, for launching apps and scripts, the two apps mentioned above are easier to configure when used in combination with each other and Awesome.
"Simple X Hotkey Daemon" or "sxhkd", is a tool which reads input events from your keyboard and executes commands associated to those key presses. Using "sxhkd" will make configuring your hotkeys for launching apps far easier than having to edit your rc.lua config file to add key binds in "Lua" syntax. Plus, it can be used with any window manager you may decide to switch to in the future.
Installing sxhkd and Rofi
We'll first install "sxhkd", and "Rofi". Then create a hotkey to launch Rofi.
Open a terminal and type:
1sudo pacman -S sxhkd rofi
sxhkd Configuration
In order for sxhkd to work, it must be run when Awesome starts up. It will then read from a config file in ~/.config/sxhkd/sxhkdrc for the key bindings you've set to launch apps or perform actions when button combinations are pressed on your keyboard.
First let's create the config file and open it in a text editor.
In the terminal type:
1mkdir ~/.config/sxhkd
2touch ~/.config/sxhkd/sxhkdrc
3mousepad ~/.config/sxhkd/sxhkdrc
Since we've only just created the sxhkdrc file, it will be empty, so you'll need to enter a few key commands.
Keybinding
Each time you make edits to the sxhkdrc config file, you'll need to restart the daemon for it to read any new changes you've made. Thankfully, we can set a hotkey for doing that right inside the sxhkdrc config file itself.
At the top of the sxhkdrc config file enter:
1####################
2# SXHKD CONFIG
3####################
4
5# Restart sxhkd hotkey daemon
6super + shift + x
7  pkill -USR1 -x sxhkd && notify-send "sxhkd config" "Reloaded."
As you can see, the syntax for defining hotkeys is very simple.
- The first line beginning with a
#is a comment or title for the app or script you wish to run. - The second line is the key combination you wish to use.
- The third line (indented with 4 spaces) is the command you wish to run.
1# This is a comment
2key combinations go here
3    command goes here
You can now start adding some useful keys to the sxhkdrc file.
On a new line in your sxhkdrc enter:
 1####################
 2# APPS
 3####################
 4
 5# Thunar Filemanager
 6super + t
 7   thunar
 8
 9# Thunderbird
10super + alt + t
11   thunderbird
Key Concatenation
In the above example, we added two key binds for the letter t, to launch two apps, "Thunar" and "Thunderbird". However, in sxhkdrc, you can concatenate key bindings on the same line to perform two different actions. Linux users hate "bloat", so by using this feature you can reduce the size of the sxhkdrc file. This can also help you keep track of keys you're already using without accidentally creating duplicates further down in your config file.
For example, if you wanted Super + t to launch Thunar, and Super + Alt + t to launch Thunderbird, you can do it like this:
1# Thunar & Thunderbird
2super + {_,alt + }t
3	{thunar, thunderbird}
Key Chords
You can also create key chords, which will allow you to press a number of hotkeys in sequence for launching apps or scripts. For example, say you have a bunch of favourite text editors, and you want to put them all under a memorable key bind, super + e, followed by a letter to launch a specific editor. This would save having to use separate key binds and letters for each editor.
This is the format in which you'd create your key chords in sxhkdrc:
1# Text Editors
2super + e; {e, s, v, j, m}
3    {emacsclient -c -a emacs, subl, vscodium, joplin-desktop, meld}
To launch emacs, we'd press super + e, then quickly press e, for Sublime Text it would be super + e, followed by s.
Pretty cool, huh?! This is another reason why I use sxhkd, instead of adding all my app hotkeys into the rc.lua file. Using sxhkd, we avoid adding unnecessary levels of complexity and bloat into the Awesome configuration, which would make things harder to manage in the future.
Launching Rofi with sxhkd
In order to use Rofi, we'll obviously need to define a hotkey to launch it. To do this, on a new line, add the following to your sxhkdrc file:
1####################
2# Rofi
3####################
4
5# Rofi Launcher
6super + space
7    rofi -show drun -show-icons
:fire: IMPORTANT: The rc.lua config file has a hotkey set to switch window layouts already mapped to Super + Space, so you'll need edit or comment out in order for sxhkd to be able to use this key bind. If you don't do this, then the Awesome hotkeys will take priority over sxhkd, blocking it from working.
Edit rc.lua, go to line 411 and comment out the "select next" function with double-dashes:
1--awful.key({modkey,         }, "space", function () awful.layout.inc ( 1)      end,
2--         {description = "select next", group = "layout"}),
Alternatively, you could edit the same line to use super + shift + space, so it no longer conflicts with sxhkd:
1awful.key({modkey, "Shift"}, "space", function () awful.layout.inc ( 1)      end,
2         {description = "select next", group = "layout"}),
It would be a good idea to check both your rc.lua and sxhkdrc file for conflicting hotkeys. In the event that a hot key does conflict with what you wish to use in either configuration, it's up to you to comment out or remap them to something else.
Media Keys
Most keyboards come with media buttons on them which allow you to control your audio. While these keys are recognized in a desktop environment such as Xfce and KDE, they may not be bound to anything by default in Awesome, so you may have to define them in sxhkdrc as shown below.
If you don't have your media keys set in your rc.lua file, you can add them to your sxhkdrc like this:
 1####################
 2# Media Keys
 3####################
 4
 5# Pulse Audio Volume Control
 6super + p
 7    pavucontrol
 8
 9# Pulse Audio Master Volume
10super + {Down,Up}
11    amixer set Master {5%-,5%+}
12
13# Speaker Volume
14XF86Audio{Mute,Play,LowerVolume,RaiseVolume}
15    amixer set Master {toggle,toggle,5%-,5%+}
16
17# Mute Mic Audio
18XF86AudioMicMute
19    amixer set Capture toggle
Screenshot Functionality
People who use a standard desktop like Xfce or KDE will be familiar with the ability to easily take screenshots by pressing the PrtScn key. However, since we are only using a minimal window manager like Awesome, those extra features that a normal desktop environment provide will be missing by default.
We can add a key bind to sxhkdrc, so that we can take screenshots of the desktop or a specific window and save it as an image. Once defined, we can press the Print Screen button and left-click or drag a box-selection over the area/window we wish to snapshot.
If you haven't already, create a folder named $HOME/Pictures/screenshots/ and then install "maim" and "xclip".
1mkdir ~/Pictures/screenshots
2sudo pacman -S maim xclip
Then, in the sxhkdrc file, on a new line enter this:
1####################
2# SCREEN SNAPSHOTS
3####################
4
5# Print Screen
6Print
7    maim -s --hidecursor | tee ~/Pictures/screenshots/$(whoami)_screenshot_$(date +%Y_%m_%d_%H-%M-%S).jpg | xclip -selection clipboard -t image/jpg
Sharing Screenshots via Dropbox
You can define a location for where a screenshot file will go. I often use a shared Dropbox folder to share gaming or desktop screenshots with a friend.
You can do it by adding this line to your sxhkdrc:
1# Print Screen To Dropbox
2ctrl + Print
3    maim -s --hidecursor | tee ~/Dropbox/Shared_Folder/screenshots/$(whoami)_screenshot_$(date +%Y_%m_%d_%H-%M-%S).jpg | xclip -selection clipboard -t image/jpg
After you've made your edits to your config files, save your changes.
Autostart Script
When you log in to Awesome, you'll notice that apps which usually start up when you log in to Xfce are missing. There's no network connection icon, clipboard manager, and you may be missing other applets from your system tray.
Since most of those applets are programmed to work with the Xfce desktop, they may not work with AwesomeWM. Therefore, we'll need to use "desktop-agnostic" versions of these apps, and create a script to run them from within Awesome.
Create AutoStart Script
First, create a new file:
1mkdir -p ~/.scripts
2touch ~/.scripts/awesome_autostart.sh
We can use this script to load the sxhkd hotkey daemon and any other apps/applets when Awesome starts.
With your text editor, navigate to the newly created ~/.scripts/awesome_autostart.sh file and open it. Then add the following code, along with any applications you wish to run when Awesome loads or is reset.
Here is my awesome_autostart.sh script as an example:
 1#!/usr/bin/env bash
 2# .scripts/awesome_autostart.sh
 3# Launch Apps when AwesomeWM starts.
 4
 5function run {
 6  if ! pgrep -f $1 ;
 7  then
 8    $@&
 9  fi
10}
11
12# List the apps you wish to run on startup below preceded with "run"
13
14# Policy kit (needed for GUI apps to ask for password)
15run /usr/lib/polkit-gnome/polkit-gnome-authentication-agent-1
16# xrandr layout for AwesomeWM
17run ~/.scripts/awesome_display_layout.sh
18# Start compositor
19run picom --experimental-backend
20# sxhkd Hotkeys
21run sxhkd
22# Start Volume Control applet
23run volctl
24# Start Network Manager Applet
25run nm-applet
26# Set Numlock key to active.
27run numlockx
28# Screensaver
29run xscreensaver -no-splash
30# Pamac system update notifications
31run pamac-tray
32# Start Dropbox
33run dropbox
34# Bluetooth
35run blueman-tray
36# MPD
37run mpd ~/.config/mpd/mpd.conf
38# Unclutter - (hides mouse pointer after 5 seconds of inactivity)
39run unclutter
Running The Autostart Script With Awesome
Now that you've got a script containing all the apps you wish to run, in order for Awesome to run those apps, you'll need to add a line of code at the bottom of your rc.lua configuration file.
Firstly, ensure that you've set execute permissions for your awesome_autostart.sh file, else it'll not be executed.
1chmod +x ~/.scripts/awesome_autostart.sh
Edit your rc.lua file and add the following at the very bottom:
1-- Autostart Apps
2awful.spawn.with_shell("~/.scripts/awesome_autostart.sh")
Once all this is complete, save your changes, log out of Awesome by pressing Super + Shift + q. After you log back in to Awesome, it will load what you've added into the awesome_autostart.sh file.
Rofi
Awesome has a built-in "run launcher", which you can access by pressing Super + r. From this, you can launch apps by simply typing their name and pressing Return. Sadly, it's pretty basic, therefore, when it comes to launching apps or scripts in Awesome - I use "Rofi".
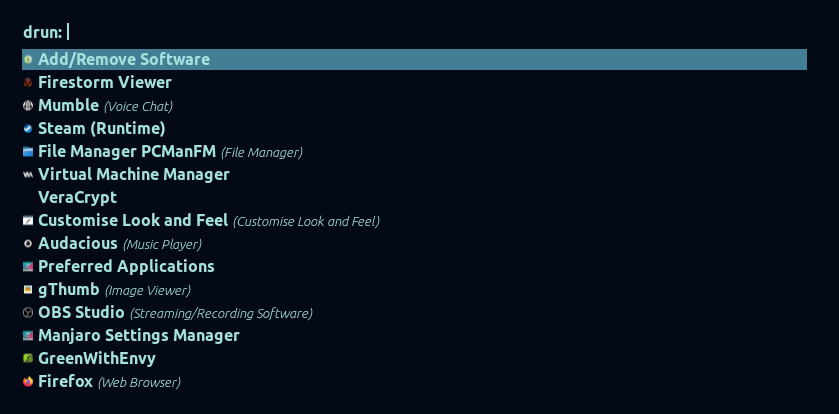
Launching Rofi
Earlier we defined a hotkey in the sxhkdrc config file to launch Rofi. You should now be able to press Super + Space to run it. To launch an app using Rofi, simply type the app name in the Rofi window. You'll notice that this is a much quicker way to load apps rather than having to navigate menus or left-click icons.
Rofi Fonts
If you wish to change the font or additional settings which Rofi uses when it displays its list, first (if it exists) remove the ~/.config/rofi/config file, and create a new configuration file:
1rm ~/.config/rofi/config
2rofi -dump-config > ~/.config/rofi/config.rasi
You can then edit this file and enable features by removing the /* and */ from the beginning and end of each line.
Example: To change the font which Rofi uses to "Ubuntu 14", we can edit line 6 like this:
1font: "Ubuntu 14";
Rofi Themes
You can change the way Rofi looks by using its theme selector.
- Launch Rofi with your Rofi hotkey,
Super + Space - While in Rofi, press
Ctrl + Tabuntil the prompt saysrun: - Type
rofiand selectrofi-theme-selectorfrom the list by pressingReturn. - Use your arrow keys to navigate through the Rofi themes and press
Returnto enable them. - Once you are happy with your chosen theme, press
Alt + ato accept it.
The next time you launch Rofi, it will use the theme you set.
This concludes this part of the AwesomeWM guide. In the next parts of the Awesome guide, we'll look at setting screen resolutions using "arandr", adding wallpapers and using the "picom" compositor.
