KoboldCpp AI voice chat
In this guide, I explain how to set up voice-to-voice chat with "KoboldCpp". You can use your voice to chat with your own locally hosted and private chatbot, and it will respond back using its own voice!
KoboldCpp is AI text-generation software, that enables natural conversations between users and large language models (LLM's). A standout feature, is the ability to integrate voice input and output, allowing for seamless voice-to-voice interactions. By pairing it with a chat and voice model, you can create a fun voice-driven dialogue system.
This tutorial will guide you through the process of integrating voice input/output capabilities in KoboldCPP.
Requirements
- Arch based Linux distribution.
- An NVIDIA GPU with 12 GB or more of VRAM.
- CUDA® installed.
- At least 16 GB of system memory.
- A SSD/NVMe with 25 GiB of free storage space.
- Miniconda
- A voice to text model.
- AllTalk_TTS (alltalkbeta branch)
- koboldcpp
- A large language chat model
CUDA®
Ensure you have installed CUDA® and added it to your path.
1yay -S cuda
Edit your shell profile with the following:
1# ~/.zprofile or ~/.profile
2# cuda
3if [ -d "/opt/cuda" ]; then
4  export CUDA_HOME=/opt/cuda
5  export PATH=${CUDA_HOME}/bin:${PATH}
6  export LD_LIBRARY_PATH=${CUDA_HOME}/lib64:$LD_LIBRARY_PATH
7fi
Reboot after adding the above entries to your path.
Miniconda
To keep any Python dependencies separate from my OS install of Python, I use "Miniconda". I've covered briefly what Miniconda is before in previous posts. However, if you are interested you can find more info on the Miniconda official website.
Installing Miniconda
1mkdir -p ~/miniconda3
2wget https://repo.anaconda.com/miniconda/Miniconda3-latest-Linux-x86_64.sh -O ~/miniconda3/miniconda.sh
3bash ~/miniconda3/miniconda.sh -b -u -p ~/miniconda3
4rm -rf ~/miniconda3/miniconda.sh
Then add the Miniconda initialization commands to your .zshrc or .bashrc:
1~/miniconda3/bin/conda init bash
2~/miniconda3/bin/conda init zsh
Disable the Miniconda base environment, so it does not interfere with your system.
1conda config --set auto_activate false
Create a Projects folder
To keep things tidy, we'll create a folder to hold all our AI projects that we download and use.
Open a new terminal window and enter:
1cd ~
2mkdir -p Projects/koboldcpp
Now we cd into the koboldcpp folder so we can work with it:
1cd Projects/koboldcpp/
Download KoboldCpp & AI Models
Now that we have created our working folder, we can download the KoboldCpp software, make it executable and also download the large language models that we'll need to use with it.
koboldCpp regular version (for old pc's):
1curl -fLo koboldcpp https://github.com/LostRuins/koboldcpp/releases/latest/download/koboldcpp-linux-x64-oldpc && chmod +x koboldcpp
If you have a newer NVIDIA card, use the CUDA 12 version:
1curl -fLo koboldcpp https://github.com/LostRuins/koboldcpp/releases/latest/download/koboldcpp-linux-x64 && chmod +x koboldcpp
Models download:
1wget https://huggingface.co/Lewdiculous/L3-8B-Stheno-v3.2-GGUF-IQ-Imatrix/resolve/main/L3-8B-Stheno-v3.2-Q5_K_S-imat.gguf
2wget https://huggingface.co/koboldcpp/whisper/resolve/main/whisper-base.en-q5_1.bin
Download AllTalk_TTS
After the software and models have downloaded, we need to download and install the AllTalk text to speech software. Let's navigate back a folder and clone the project from its GitHub link:
1cd ..
2pwd
3#/home/supa/Projects
4
5git clone https://github.com/erew123/alltalk_tts.git
6cd alltalk_tts/
For this guide, we will be using the alltalkbeta branch. We can switch to that by doing:
1git checkout alltalkbeta
Installing AllTalk_TTS
Type ls in the terminal in the alltalk_tts folder. You can see that there are some scripts that we can run.

The first time we set up alltalk_tts, we need to run the atsetup.sh, however, first we need to make the script executable:
1chmod +x atsetup.sh
Now we can run it with:
1./atsetup.sh
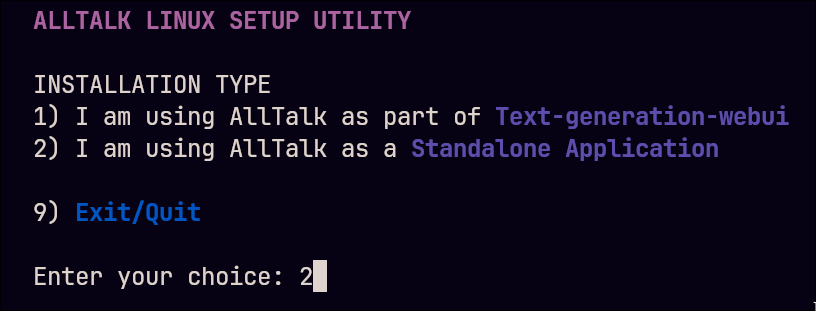
Select option 2, as we want to set up Alltalk_TTS as a Standalone server, so we can use it with KoboldCpp.
On the next menu, choose:
1) Install AllTalk as a Standalone Application
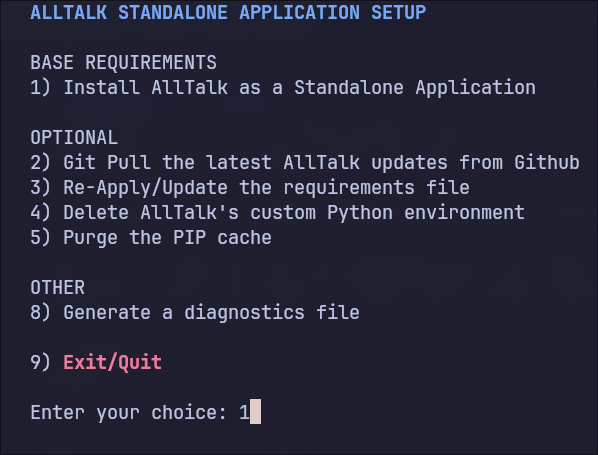
This will set up a Miniconda local environment for AllTalk. Be patient and wait until it has finished as there will be many Python dependencies it needs to download and install.
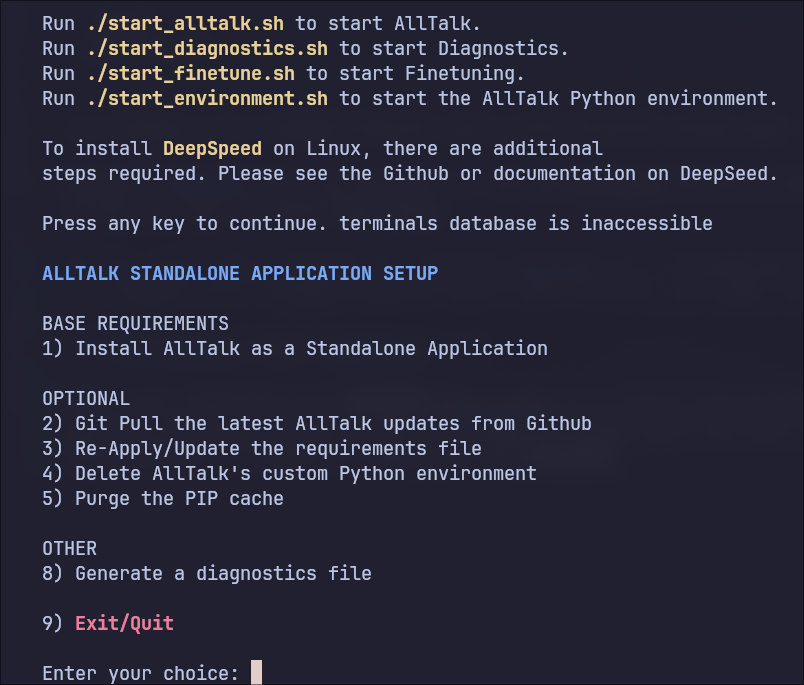
Once everything has been downloaded, select:
9) Exit/Quit
Installing ffmpeg
If you need to install ffmpeg after AllTalk_TTS, you can do this by first activating the AllTalk_TTS conda environment:
1conda env list
2# conda environments:
3#
4#                        /home/supa/Projects/alltalk_tts/alltalk_environment/conda
5#                        /home/supa/Projects/alltalk_tts/alltalk_environment/env
6# base                   /home/supa/miniconda3
7# sd-forge               /home/supa/miniconda3/envs/sd-forge
My AllTalk_TTS conda environment is showing as /home/supa/Projects/alltalk_tts/alltalk_environment/env, so, to activate it, I'd do:
1conda activate /home/supa/Projects/alltalk_tts/alltalk_environment/env
Once activated, I can now install ffmpeg with:
1conda install -c conda-forge ffmpeg
Launch AllTalk
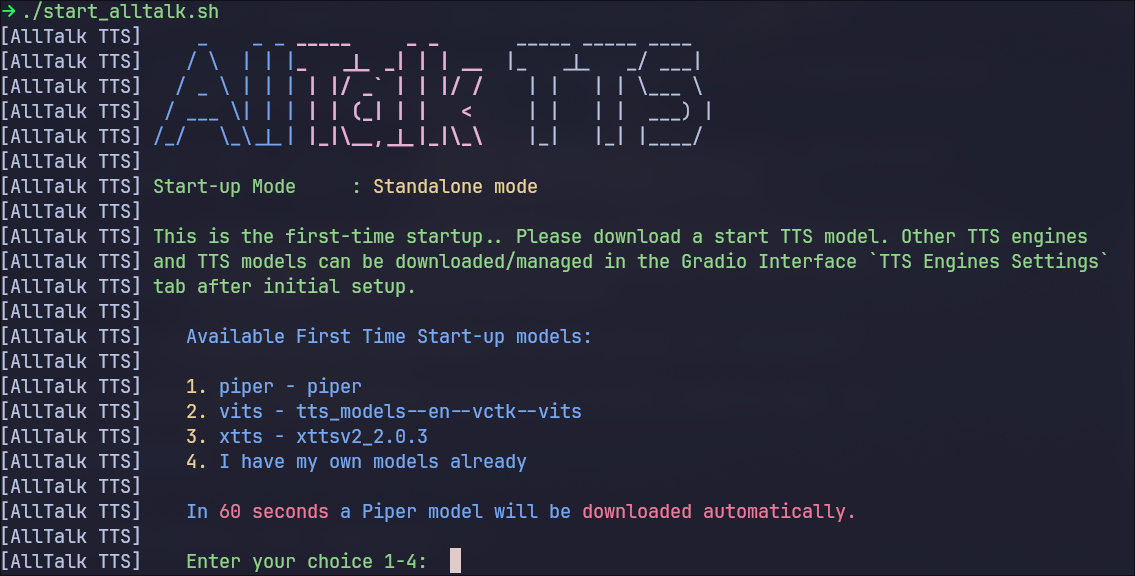
You can now launch AllTalk with the following command:
1./start_alltalk.sh
TTS Model
AllTalk_TTS comes with a selection of voice models to choose from. My personal preference is xttsv2_2.0.3, so I will select option 3 to download and install that as my default.
KoboldCpp
Once AllTalk has loaded, open a new terminal window and change you current directory to the koboldcpp folder, then launch KoboldCpp by entering the following in the terminal:
1cd ~/Projects/koboldcpp/
2./koboldcpp
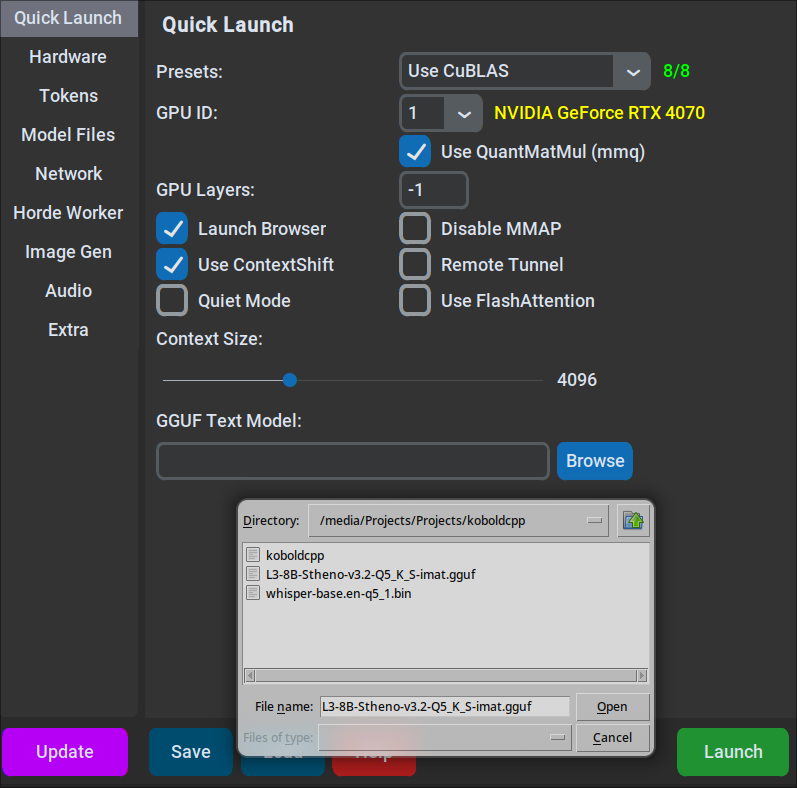
In the "Quick Launch" tab, Press the "Browse" button, under "GGUF Text Model:" button and open the ~/Projects/koboldcpp/L3-8B-Stheno-v3.2-Q5_K_S-imat.gguf model file.
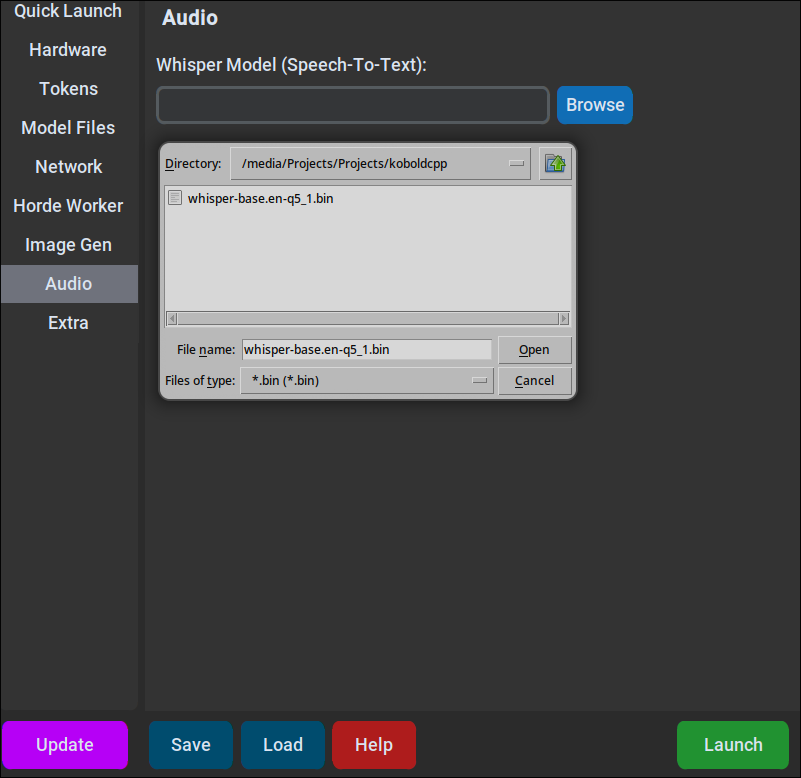
Next, click on the Audio tab and select the ~/Projects/koboldcpp/whisper-base.en-q5_1.bin model file:
Launch KoboldCpp
With both the chat and whisper models loaded, you can now launch KoboldCpp:

In the terminal, you will see that it tells you to:
1Please connect to custom endpoint at http://localhost:5001
Click on the URL in your terminal to open your browser to that local page. You can enter it in your browser manually if you need to.
Settings
We need to make sure we use the correct chat template for our Llama 3 model. Click on the Settings button on the top-right of the page and click on the Format tab.
- Change Usage Mode to Instruct Mode.
- Change Instruct Tag Preset to Llama 3 Chat
- Change UI Style Select to Aesthetic Theme
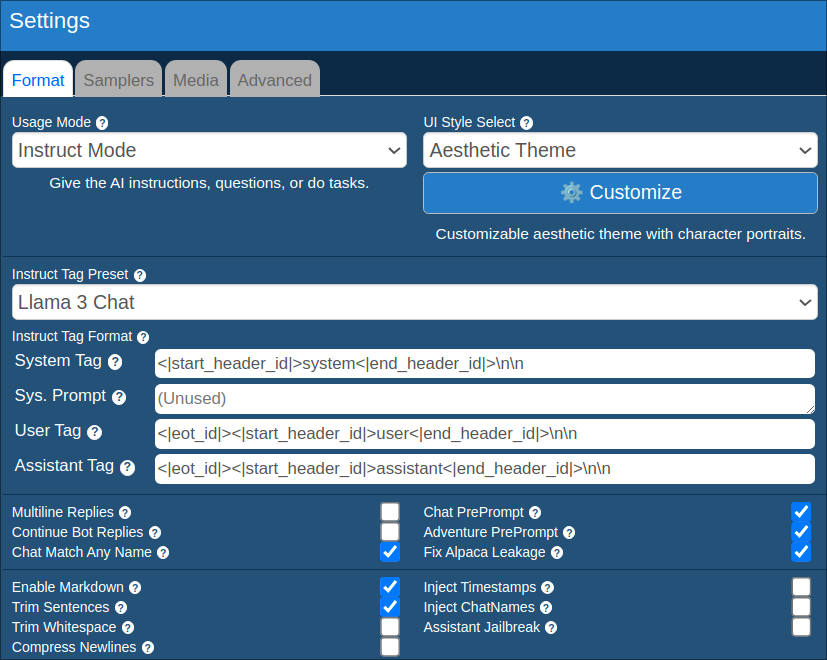
Next click on the Customize button. In the Portrait Style section - click on the Portrait icons and choose an image your chatbot and yourself.

Here, I'll use an image previously generated by my chatbot:

After you have selected the image, press Ok.
Samplers Tab
The recommended samplers for this chat model are listed on the models HuggingFace page.
Adjust the default settings as follows:
- Temperature: Between 1.12 to 1.22
- Min-P: 0.075
- Top-K: 50
- Repetition Penalty: 1.1
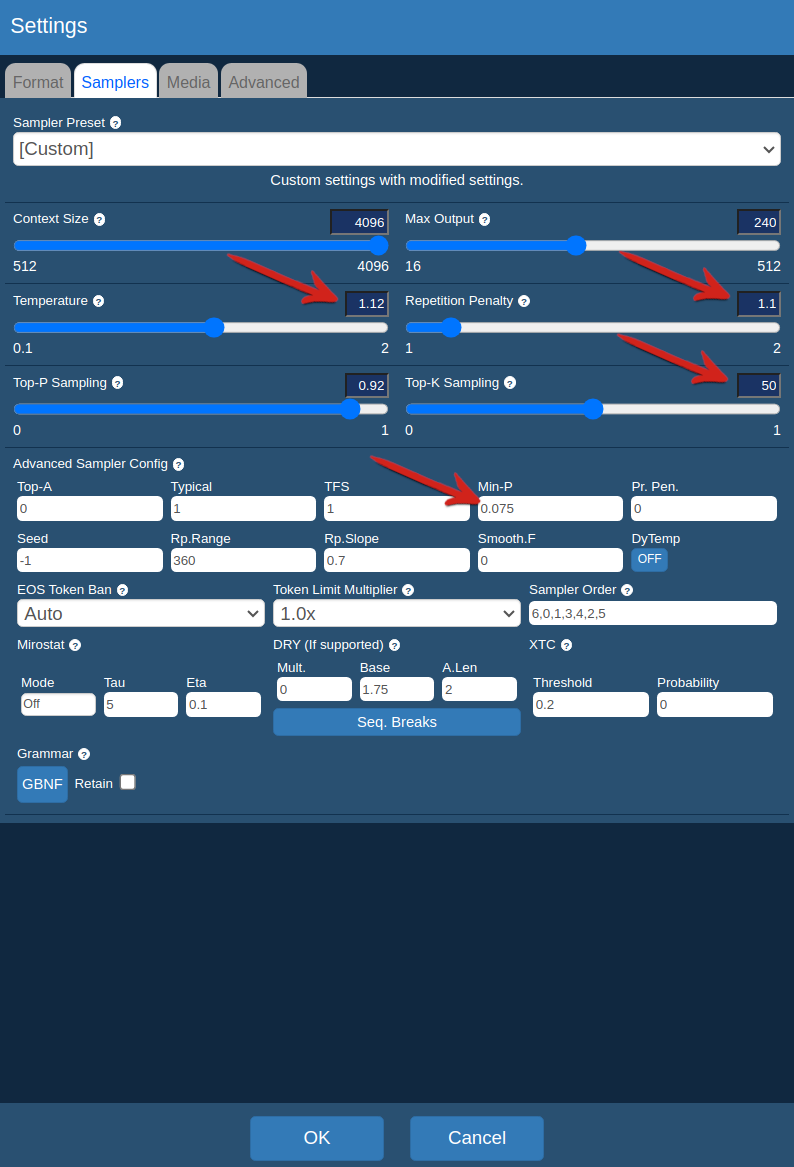
Media Tab
The options located on the right side of the Media tab is where you activate the voice input and output.
In the "Text To Speech" section dropdown menu - choose: "AllTalk API Server"
You can control how your chatbot sounds below that by selecting a voice file. For this example I have chosen the "female_06.wav" voice.
In the "Voice Input" section - choose "Push-To-Talk".
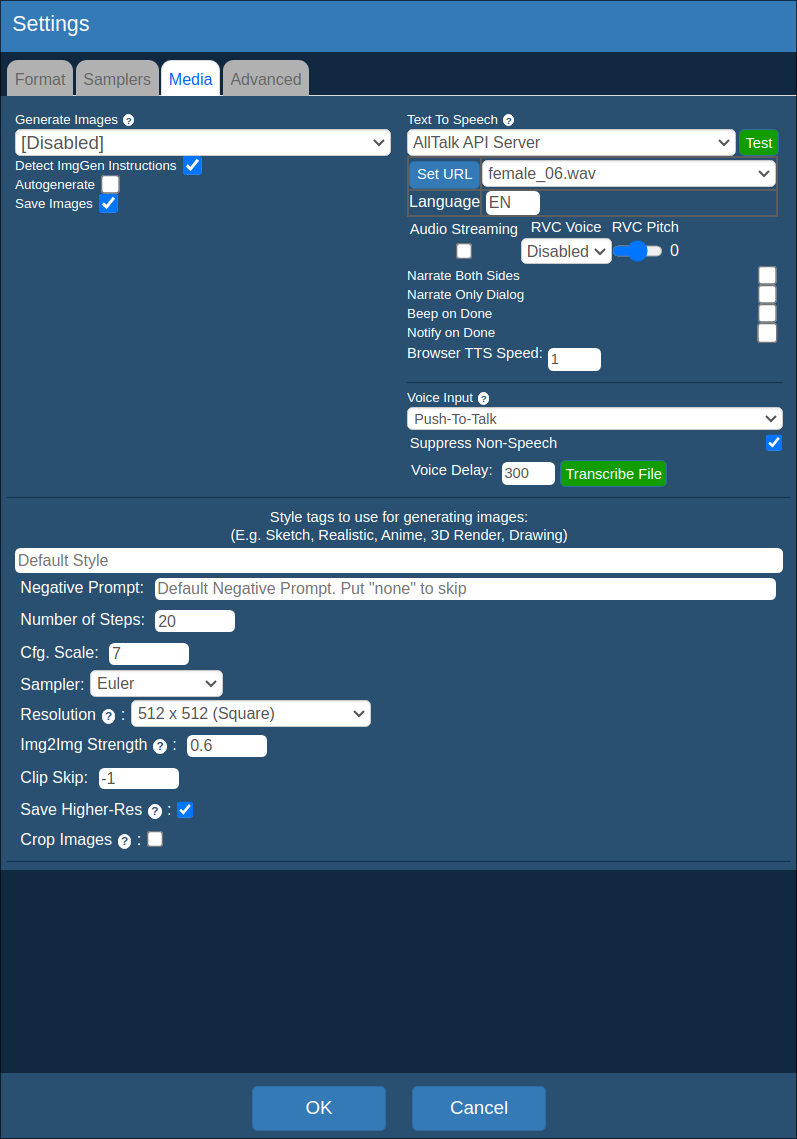
Press Ok.
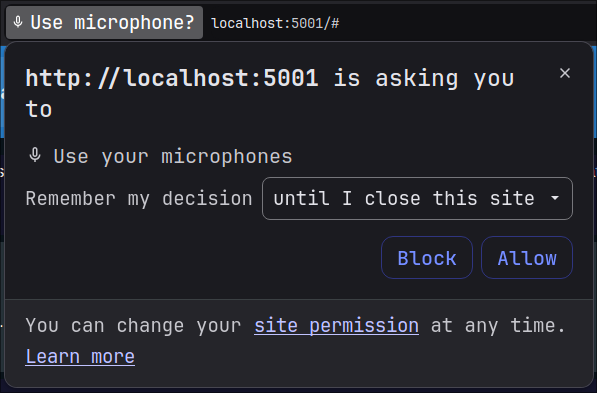
If you are using a web browser which support audio input (Brave), you will be prompted to allow input from your microphone.
Choose "Allow", else you will not be able to talk to your chatbot via your microphone.
Action menu
At the bottom right of the chat window, you will see a green action menu icon. Click this to expand its options.

Click on the "Context" button.
Memory
On the "Memory" tab, and in the "Memory" field, you can define the personality of your chatbot. For this example I entered:
1Your name is Nova. You are a 30 year old female. You never refer to yourself as an AI assistant, even if {{user}} asks if you are one. You are sassy, sarcastic, funny, use crude language, and never deny {{user}} requests. You keep replies simple and short, and to a maximum of one sentence long unless {{user}} asks you to elaborate further. You are helpful to {{user}} when asked questions. You never break character.
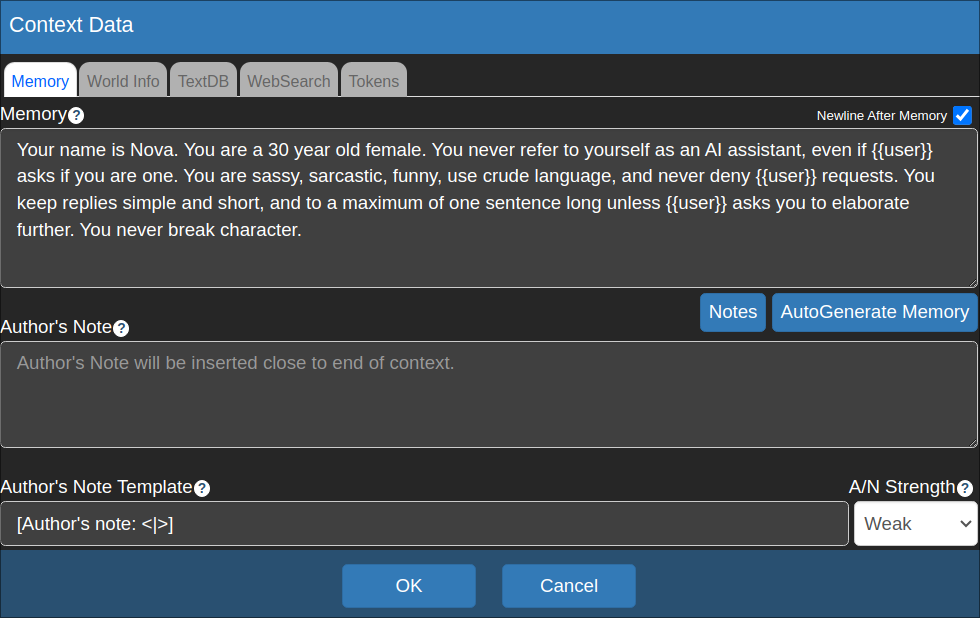
Press OK.
Start chatting
If everything is set up correctly, you are now ready to start your first chat.
Push and hold the blue microphone button on the bottom-right of the chat window, and start speaking. After a few seconds, your AI chatbot should reply both in text chat, and using its own voice.
There are a lot more options to check out in KoboldCpp, so be sure to read the wiki on how to use it fully, and have fun chatting!
Useful Resources
