The Elder Scrolls V: Skyrim Modding Guide for Linux
Hello my fellow penguins! This guide will show you how to set up a Skyrim modding environment for the original “The Elder Scrolls V: Skyrim” on Linux, using a modified Steam Proton run script.
Please note, that this guide IS NOT for “The Elder Scrolls V: Skyrim Special Edition” - it’s for the older “The Elder Scrolls V: Skyrim” or “Legendary Edition”. If you are looking to play with "ModOrganizer 2" and "TESV: Skyrim Special Edition", there is a Lutris installer here.
This guide assumes that,
- you are familiar with modding Skyrim already,
- know how to use the modding tools mentioned below,
- have the necessary graphics drivers installed on your system.
Advanced User
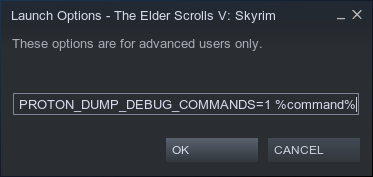
What we are doing in this guide is adding a prelaunch command to the game in Steam and running with Proton 4.11-13.
1PROTON_DUMP_DEBUG_COMMANDS=1 %command%
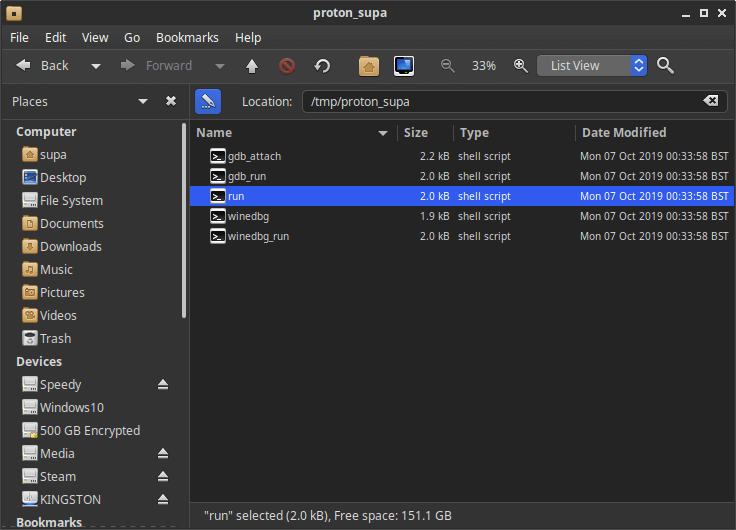
When the game is first run with this prelaunch command, it will create a file named run in /tmp/proton_username. We then edit this file and replace the line which would normally launch the Skyrim launcher with the path to the Mod Organizer executable. From there, we can then launch Mod Organizer from within the Proton prefix and add the necessary modding tools into Mod Organizer, including a few tweaks to get everything going. Then we make a copy of the script from /tmp, and set it as executable, so we can launch the modding environment from the terminal or app launcher with one script.
The Modding Environment
This guide covers the installation of,
- A modified Proton launcher script.
- Body Slide and Outfit Studio
- FNIS
- LOOT
- Mator Smash
- Merge Plugins
- Mod Organizer
- Steam Play "Proton"
- Protontricks
- SKSE
- Wine
- Winetricks
- Wrye Bash
Introduction
Modding Skyrim has always been a labour of love for me. Out of the 2000+ hours I’ve spent playing it over the years, I think I’ve spent about the same amount of time modding it.
In 2012, I posted a video to YouTube showing how to mod the game using “PlayOnLinux”. Back then, using POL was just about the only way of adding “Mod Organizer” to a Skyrim Wine "bottle" easily.
Times have moved on, and while Skyrim worked good under POL, now, with the advent of “Steam Play” with “Proton”, things just got seriously better. Therefore, I’ve adapted some of my old POL techniques to create an updated guide showing how to get Skyrim working inside a Proton prefix, with all the modding tools you’ll need to get you going.
For this guide I was using “Xubuntu 18.04.3”. If you're on another Linux distribution, you can install the same Linux apps via your distros package manager.
Modding The Game
It’s tricky enough (even on Windows) to get all those mods to behave and work together in a functional way. But move over to Linux, and before you even begin doing that, things can get even trickier. While modding the game with the mod tools itself is pretty straight forward - setting up that environment on Linux can be a pain for some. This is mainly because of the many DLL’s which Windows programs depend on. No doubt you’ve come across these issues yourself if you’ve tried to use “LOOT” and seen that it fails to run or seen “FNIS” spew out errors when trying to use it…
Well, after trawling the internet for almost every single tip on getting these tools up and going on Linux — I’ve compiled this guide, which hopefully will work for you as well as it works for me. At present, I have 230 mods running in Skyrim, managed by “Mod Organizer”, sorted by “LOOT”, merged with "Merge Plugins" and patched by “Wryebash” and "Mator Smash". I can add hundreds of custom animations using “FNIS”, all from within the same modding environment, all on Linux, just like I could on Windows.
Hardware
A modded Skyrim can be pretty heavy on disk usage, as the game will have to load hundreds of plugins, textures, sounds and everything else which you add to the game. For that reason, I suggest keeping your game and all the mods for it on a SSD. This will greatly decrease the load times, and trust me, you’ll have a far more pleasant experience running all this from an SSD rather than a normal hard drive, as you won’t have to sit and listen to your drive crunching away as it loads everything in. You’ll also want to ensure you have the latest graphics drivers, Vulkan libraries and Wine already installed for your system.
Let’s get started.
Nexus Mods
If you haven’t already - set up a free account on Nexus Mods. You’ll need this in order to download mods for use with “Mod Organizer”. Once you’re logged in to the site, you’ll be able to browse for mods and add them to your game by manually downloading and installing them with “Mod Organizer”.
Mod Tools Folder
Create a folder in your Home for your modding tools. I have mine set to ~/Games/Skyrim/Modding Tools. This is the location I have my “Mod Organizer”, “LOOT”, “TES5Edit” folders in. The reason for this, is that if you put them into your ~/.steam/steam/steamapps/common/Skyrim/ folder, when you try to add these tools to Mod Organizer - it can be tricky to follow paths into Linux hidden folders with programs running in Wine. (The ones named like “/.steam/” or “/.games/”). So to make life easier on yourself, just create a visible "Games" folder in your Home folder for these. I’d even recommend creating a new Steam Library in your new Games folder for Skyrim rather than the default ~/.steam/steamapps/common/ and installing Skyrim there if you are having any issues.
For the mod tools location,
1~/Games/Skyrim/Modding Tools/
For the game itself,
1~/Games/SteamLibrary/steamapps/common/Skyrim/
The Modding Tools
In order to set up the modding environment. You’ll need to download a few things first. Download these tools to use in your modding environment. We will install these later. For now, just leave them in your Downloads/ folder.
- Mod Organizer 1_3_11 , get the “full manual-installation archive”. A guide on using “Mod Organizer” can be found here and here
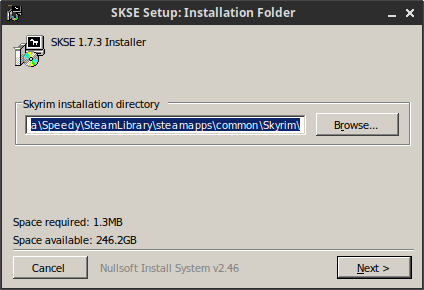
- SKSE. This is essential for running mods that use scripts. Get the 1.7.3 installer here.
- LOOT download the latest version. This tool will sort your load order for your mods.
- FNIS the latest version should work, but at time of writing - I used version 7_5. I also installed the “FNIS Spells V5_0_1 -- ADD-ON for the spells” and “FNIS Creature Pack 6_1” files. With this tool, you can add additional character and creature animations to the game.
- Wrye Bash I installed this to create “Bashed Patches” for my mods. This prevents certain mod conflicts and handles levelled lists and allows tweaks to the gameplay settings. Download the “Wrye Bash 307 Beta 4 - Installer”.
- TES5Edit 4 AKA “xEdit”. This tool is used for cleaning dirty edits in plugins. A tutorial for plugin cleaning can be found here.
Proton Version Testing
I've tested a number of past and present Proton versions for use OOTB with Skyrim LE. Rather than spam the result into this already lengthy guide - I've documented my results here at my GitLab.
Winetricks
The version of winetricks which ships with Ubuntu is outdated. So, in terminal, check the version of winetricks you have by typing,
1winetricks --version
If your version is below "20190912-next", then you have an old one.
You can update winetricks in two ways. The easiest way is to type this command into your terminal,
1sudo winetricks --self-update
You can also do it manually. To check the latest release, visit: https://github.com/Winetricks/winetricks
Uninstall the old winetricks,
1sudo apt purge winetricks
To download and install winetricks manually - open a new terminal and enter,
1cd Downloads/
2mkdir winetricks-update
3cd winetricks-update/
4wget https://github.com/Winetricks/winetricks/archive/master.zip
5unzip master.zip
6cd winetricks-master/
7sudo make install
8winetricks --version
Skyrim Launch Options
- Open Steam and enable “Steam Play” with “Steam > Settings > Enable Steam Play for all other titles.” and “Enable Steam Play for supported titles”.
- In the drop-down menu under “Run other titles with” select “Proton 4.11-13”. If you don't have Proton 4.11, you can search for it in Steam and download it. I've tested older and newer versions of Proton, and custom versions such as "Proton-GE", however Proton 4.11-13 worked best for me for Mod Organizer.
- Download and install “The Elder Scrolls V: Skyrim”.
- Once the game has downloaded, right-click on the game in your library, select Properties > SET LAUNCH OPTIONS and add,
PROTON_DUMP_DEBUG_COMMANDS=1 %command%
- Select “Proton 4.11-13” under "Force the use of a specific Steam Play compatibility tool."
- Run the game so that the launcher pops up.
- Set your graphics settings for the game in the launcher and run the game once so the Proton prefix is created, then quit it.
- A Proton prefix will have been created for the game. The default location is usually
~/.steam/steam/steamapps/compatdata/72850/pfx/ - Copy and paste the path of your Steam
/compatdata/72850/pfxfolder (which is specific for your system) into a text editor, so we can use later in Winetricks to fix a problem with FNIS.
Mod Organizer
Next, we need to install “Mod Organizer” from the Downloads folder.
- Right-click on the .zip file and select Extract Here.
- Copy the unzipped “ModOrganizer” folder to your
~/Games/Skyrim/Modding Tools/folder. - Navigate to the ModOrganizer folder and right-click on the “ModOrganizer.exe” and select “Copy” from your file manager. This will copy the path to the Windows executable which we will use in the custom “Proton Run Script” below.
Proton Run Script
Navigate with your file manager to the /tmp folder. On most Linux file managers this is usually in “File System” tmp/
There will be a folder in there named proton_[your_username]. In that folder will be a file named run. This file is generated when you added PROTON_DUMP_DEBUG_COMMANDS=1 %command%to the launch options for the game.
Open this file with a text editor.
The file will look something like this,
 1#!/bin/bash
 2#Run game or given command in environment
 3cd "$HOME/.steam/steam/steamapps/common/Skyrim"
 4DEF_CMD=("$HOME/.steam/steam/steamapps/common/Skyrim/SkyrimLauncher.exe")
 5PATH="$HOME/.steam/steam/steamapps/common/Proton 4.11/dist/bin/:$HOME/.steam/ubuntu12_32/steam-runtime/amd64/bin:$HOME/.steam/ubuntu12_32/steam-runtime/amd64/usr/bin:$HOME/.local/bin:/usr/local/sbin:/usr/local/bin:/usr/sbin:/usr/bin:/sbin:/bin:/usr/games:/usr/local/games:/snap/bin:$HOME/.local/bin" \
 6    TERM="xterm" \
 7    WINEDEBUG="-all" \
 8    WINEDLLPATH="$HOME/.steam/steam/steamapps/common/Proton 4.11/dist/lib64//wine:$HOME/.steam/steam/steamapps/common/Proton 4.11/dist/lib//wine" \
 9    LD_LIBRARY_PATH="$HOME/.steam/steam/steamapps/common/Proton 4.11/dist/lib64/:$HOME/.steam/steam/steamapps/common/Proton 4.11/dist/lib/:$HOME/.steam/ubuntu12_32/steam-runtime/pinned_libs_32:$HOME/.steam/ubuntu12_32/steam-runtime/pinned_libs_64:/usr/lib/x86_64-linux-gnu/libfakeroot:/lib/i386-linux-gnu:/usr/lib/i386-linux-gnu:/usr/local/lib:/lib/x86_64-linux-gnu:/usr/lib/x86_64-linux-gnu:/lib32:/usr/lib32:/lib:/usr/lib:/usr/lib/i386-linux-gnu/sse2:$HOME/.steam/ubuntu12_32/steam-runtime/i386/lib/i386-linux-gnu:$HOME/.steam/ubuntu12_32/steam-runtime/i386/lib:$HOME/.steam/ubuntu12_32/steam-runtime/i386/usr/lib/i386-linux-gnu:$HOME/.steam/ubuntu12_32/steam-runtime/i386/usr/lib:$HOME/.steam/ubuntu12_32/steam-runtime/amd64/lib/x86_64-linux-gnu:$HOME/.steam/ubuntu12_32/steam-runtime/amd64/lib:$HOME/.steam/ubuntu12_32/steam-runtime/amd64/usr/lib/x86_64-linux-gnu:$HOME/.steam/ubuntu12_32/steam-runtime/amd64/usr/lib:" \
10    WINEPREFIX="$HOME/.steam/steam/steamapps/compatdata/72850/pfx/" \
11    WINEESYNC="1" \
12    SteamGameId="72850" \
13    SteamAppId="72850" \
14    WINEDLLOVERRIDES="steam.exe=b;mfplay=n;d3d11=n;d3d10=n;d3d10core=n;d3d10_1=n;dxgi=n" \
15    STEAM_COMPAT_CLIENT_INSTALL_PATH="$HOME/.steam" \
16    "$HOME/.steam/steam/steamapps/common/Proton 4.11/dist/bin/wine" steam.exe "${@:-${DEF_CMD[@]}}"
We are going to modify this script to run ModOrganizer instead of the Skyrim launcher. You can see in the file (4 lines down) that the “DEF_CMD=” points to the Skyrim Launcher. You’ll want to replace this with the path to your “ModOrganizer.exe”. Example,
1DEF_CMD=("/home/your_username/Games/Skyrim/Skyrim Mod Tools/Mod Organizer/ModOrganizer.exe")
Then, you need to edit another line below WINEPREFIX= to say WINEESYNC=”0” \
Example,
1WINEESYNC="0" \
This is very important, because if you don’t do this, your mouse will stutter like crazy when mods are running with the game. The final file should look similar to my one below.
 1#!/bin/bash
 2#Run game or given command in environment
 3
 4cd "$HOME/.steam/steam/steamapps/common/Skyrim"
 5DEF_CMD=("$HOME/Games/Skyrim/Skyrim Mod Tools/Mod Organizer/ModOrganizer.exe")
 6PATH="$HOME/.steam/steam/steamapps/common/Proton 4.11/dist/bin/:$HOME/.steam/ubuntu12_32/steam-runtime/amd64/bin:$HOME/.steam/ubuntu12_32/steam-runtime/amd64/usr/bin:$HOME/.local/bin:/usr/local/sbin:/usr/local/bin:/usr/sbin:/usr/bin:/sbin:/bin:/usr/games:/usr/local/games:/snap/bin:$HOME/.local/bin" \
 7    TERM="xterm" \
 8    WINEDEBUG="-all" \
 9    WINEDLLPATH="$HOME/.steam/steam/steamapps/common/Proton 4.11/dist/lib64//wine:$HOME/.steam/steam/steamapps/common/Proton 4.11/dist/lib//wine" \
10    LD_LIBRARY_PATH="$HOME/.steam/steam/steamapps/common/Proton 4.11/dist/lib64/:$HOME/.steam/steam/steamapps/common/Proton 4.11/dist/lib/:$HOME/.steam/ubuntu12_32/steam-runtime/pinned_libs_32:$HOME/.steam/ubuntu12_32/steam-runtime/pinned_libs_64:/usr/lib/x86_64-linux-gnu/libfakeroot:/lib/i386-linux-gnu:/usr/lib/i386-linux-gnu:/usr/local/lib:/lib/x86_64-linux-gnu:/usr/lib/x86_64-linux-gnu:/lib32:/usr/lib32:/lib:/usr/lib:/usr/lib/i386-linux-gnu/sse2:$HOME/.steam/ubuntu12_32/steam-runtime/i386/lib/i386-linux-gnu:$HOME/.steam/ubuntu12_32/steam-runtime/i386/lib:$HOME/.steam/ubuntu12_32/steam-runtime/i386/usr/lib/i386-linux-gnu:$HOME/.steam/ubuntu12_32/steam-runtime/i386/usr/lib:$HOME/.steam/ubuntu12_32/steam-runtime/amd64/lib/x86_64-linux-gnu:$HOME/.steam/ubuntu12_32/steam-runtime/amd64/lib:$HOME/.steam/ubuntu12_32/steam-runtime/amd64/usr/lib/x86_64-linux-gnu:$HOME/.steam/ubuntu12_32/steam-runtime/amd64/usr/lib:" \
11    WINEPREFIX="$HOME/.steam/steam/steamapps/compatdata/72850/pfx/" \
12    WINEESYNC="0" \
13    SteamGameId="72850" \
14    SteamAppId="72850" \
15    WINEDLLOVERRIDES="steam.exe=b;mfplay=n;d3d11=n;d3d10=n;d3d10core=n;d3d10_1=n;dxgi=n" \
16    STEAM_COMPAT_CLIENT_INSTALL_PATH="$HOME/.steam" \
17    "$HOME/.steam/steam/steamapps/common/Proton 4.11/dist/bin/wine" steam.exe "${@:-${DEF_CMD[@]}}"
Save the newly edited run file to your ~/Games/ folder as ModOrganizer.sh
Right-click on that file with your file manager and check Properties > Permissions > “Allow executing file as program” is ticked.
Now, so long as Steam is running, you’ll be able to run “Mod Organizer” by running this script from terminal.
1cd Games/
2./ModOrganizer.sh
Adding The Proton Script To App Launcher
If you want to see this script in your Apps menu - you can create a “.desktop” file in ~/.local/share/applications/ and add the path to your script after Exec=
This way you can easily search for it and run it without using the terminal. You can create a “.desktop” file with any text editor, like this,
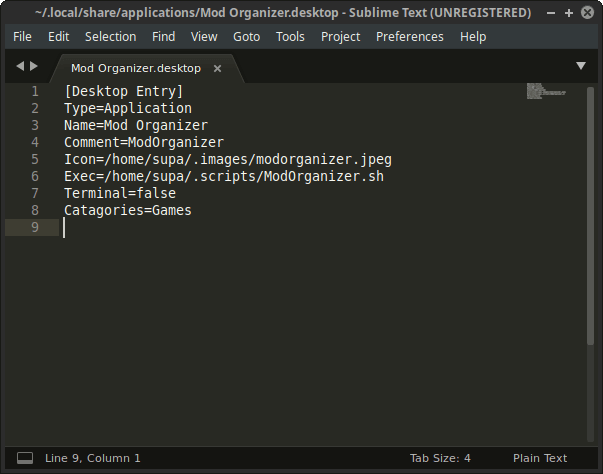
Save the file as “ModOrganizer.desktop” to your ~/.local/share/application/ folder.
Using the normal method you use for launching Linux apps, you can now launch ModOrganizer, as the “.desktop” file links to the “ModOrganizer.sh” script.
Just ensure Linux Steam is running before you launch Mod Organizer this way.
Installing SKSE with Protontricks
Many mods you download from Nexus will likely use “SKSE” in order to function. You first need to install it to the Skyrim folder in order for Mod Organizer to see and use it. So, let’s install “Protontricks” to install SKSE.
Protontricks is a very useful tool which is used in the same way as “Winetricks”, but is designed to be easier to use when adding things into Steam Proton Wine bottles.
Open a terminal and install Protontricks like this,
1sudo apt install python3-pip python3-setuptools python3-venv
2python3 -m pip install --user pipx
3~/.local/bin/pipx ensurepath
Close the terminal and open a new one to complete the Protontricks install,
1pipx install protontricks
With Protontricks installed, we can call its GUI with,
1protontricks 72850 -q --gui
When the Protontricks GUI opens,
- Choose “Select the default wineprefix” and press OK.
- Now select “Run uninstaller” and press OK.
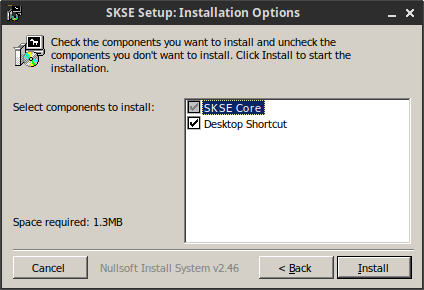
- When the “Add/Remove Programs” window pops up - select the “Install” button (top right).
- Navigate to your Downloads folder and select “skse_1_07_03_installer.exe” and open.
- Run the installer as you would on Windows and install SKSE to the Skyrim game folder.
- Press “Cancel” on the “ADD/Remove Programs” window, then you can cancel the Protontricks GUI.
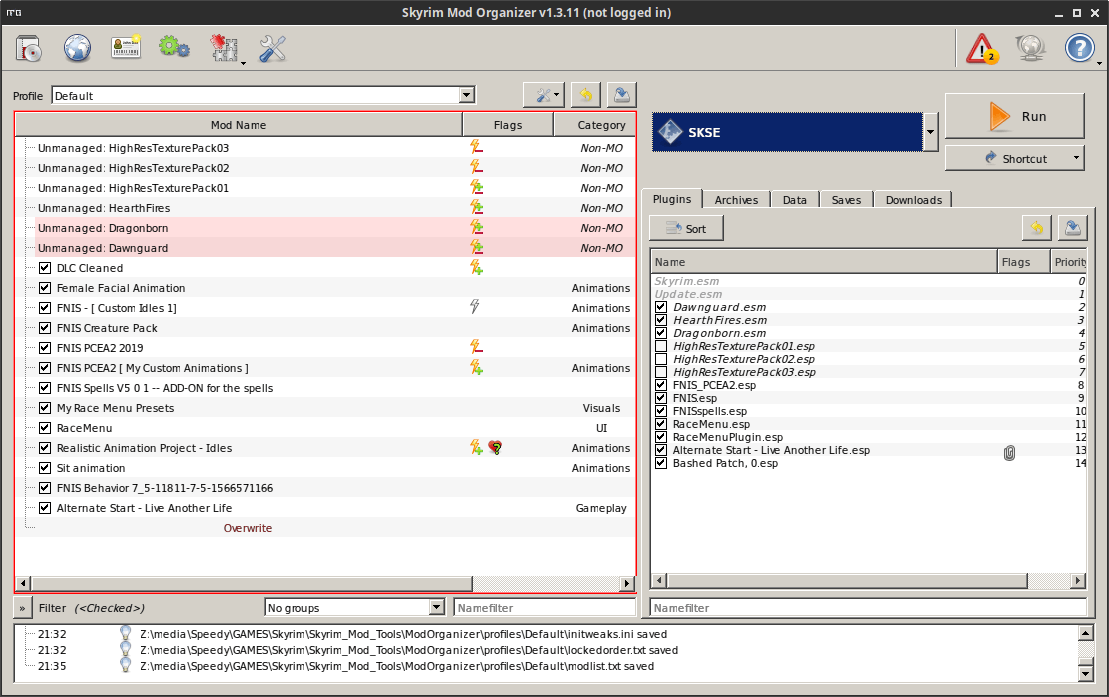
You can now manually download any mods you like from NexusMods and add them to Mod Organizer by clicking the “Install a new mod from an archive” button - top left and locating the “.zip” file for the mod in your downloads folder. You can then run Skyrim with your mods by pressing the Run button (top right) with SKSE selected in the drop-down menu.
FNIS (Fores New Idles in Skyrim)
“FNIS” is a tool used to add additional animations which come with mods to your game. This was a real pain in my ass to get working. No matter what I tried, this sucker just spat out errors. Finally, after a bit of tinkering, I got it to work. It requires “dotnet40” in order to run, but to get it to create animations correctly you need to:
- Download FNIS from Nexus Mods.
- Manually install the mod with Mod Organizer and enable it.
- A video guide on using FNIS can be found here.
- SUPER IMPORTANT: In order for FNIS to work correctly, you MUST add “dotnet40” into the Skyrim Proton prefix.
To do this with Winetricks, in a terminal do,
1WINEPREFIX=/path_to_your/steamapps/compatdata/72850/pfx/ winetricks -q --force dotnet40 vcrun2017 win7
Fixing FNIS Animation Generation Errors
If you start spotting errors when using FNIS to generate your animation files, ensure you have "dotnet40" installed as described above, then,
Method 1 (Messy)
Copy the FNIS files into the Skyrim Data folder With your file manager - navigate to the FNIS mod folder and copy the contents of the FNIS Data folder to your actual Skyrim/Data game folder.
Method 2 (Clean)
Using Symlinks If you want to keep your Skyrim Data folder totally clean of extra files from the FNIS mod, you can alternatively create a symlink from the FNIS tools folder to a Skyrim Data "tools" folder. I did this by first making the Skyrim Data folder my current directory and then adding the symlink. Replace the paths below to match your folder paths.
1cd /path_to_your/SteamLibrary/steamapps/common/Skyrim/Data
2ln -s 'path_to_your/ModOrganizer/mods/FNIS Behavior 7_5-11811-7-5-1566571166/tools' tools
Once you’ve done this, you’ll notice a new symlink is created in the Skyrim/Data folder named “tools”, this points back to the location of the FNIS mod “tools” folder. I’ve tested this with my own mod profiles, and it seems to work fine. This should prevent FNIS printing errors while creating the animations.
If you rename or update the FNIS mod folder in future, delete the old symlink in the Skyrim Data folder and generate a new one, otherwise FNIS will not be able to locate its tools folder.
Next, add FNIS to Mod Organizer via Data tab > tools > GenerateFNIS_for_Users > GenerateFNISforUsers.exe >, right click and “Add as executable”.
When you want to run FNIS, simply select it from the drop-down menu in ModOrganizer and press Run.
Additional FNIS Tips
Sometimes FNIS can bork itself in future uses. If this happens to you,
- Delete the FNIS mod folder from your “ModOrganizer/mods” folder.
- Install from the original .zip file you downloaded from Nexus and enable in Mod Organizer.
- Delete everything in your “ModOrganizer/overwrite/” folder and disable any custom mod folders you’ve created from past overwrite folders with animations for your mod profile.
- Delete the “tools” folder in your “Skyrim/Data” folder and then follow the installation steps again.
Errors When Generating Animations With FNIS
If files already exist in your Mod Organizer overwrite folder, and you try to regenerate FNIS animations, you may see an error like this,
1ERROR(2012): Could not generate: defaultfemale.hkx defaultmale.hkx weapequip.hkx staggerbehavior.hkx sprintbehavior.hkx...
To fix this, disable any custom overwrite mods you've created for your mod profile in Mod Organizer and delete the highlighted folders below in your Mod Organizer overwrite folder if they are present, then run FNIS again.
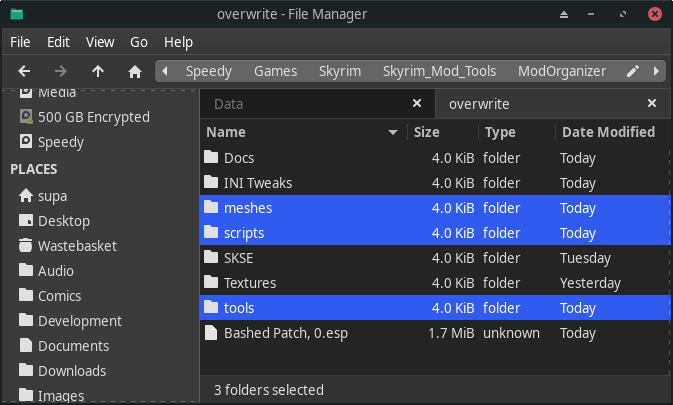
FNIS should then be able to successfully generate the animation files.
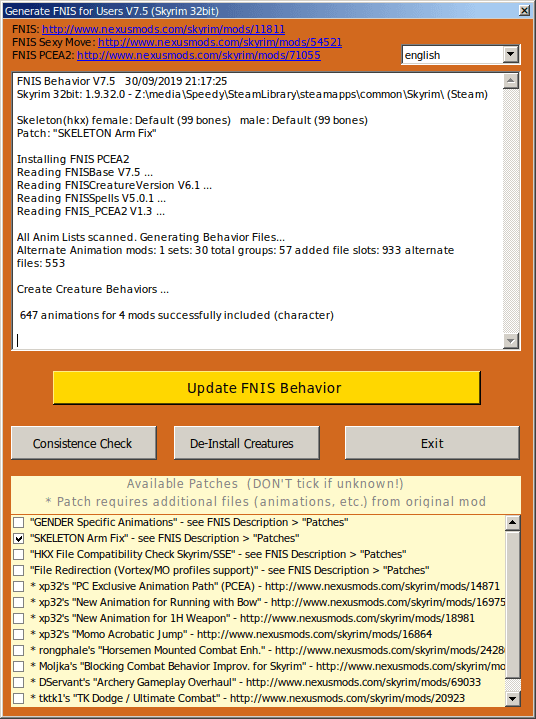
Viewing the Progress of FNIS Animation Generation
If you launched Mod Organizer via the “.desktop” shortcut, you won't see any output from the programs running in Wine. If you have a large mod load order with hundreds of animation files which you need to generate — when running FNIS, it may appear as though the program is frozen or taking a very long time to process. Therefore, when running FNIS, I'd recommend running the Proton Run script from a terminal, as you can see the output of the animation ".xml" files as the conversion process runs.
1cd Games/
2./ModOrganizer.sh
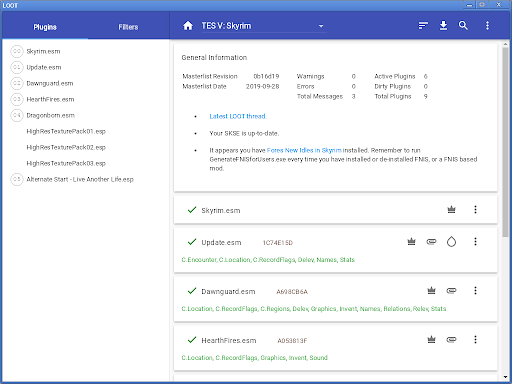
LOOT
LOOT (Load Order Optimization Tool) is a tool used to sort your plugins in the correct load order, so the game can run without mods conflicting with each other or crashing the game on startup. It needs to see where Skyrim is installed before you run it. If you’ve not done so already, select “Skyrim Launcher” from the Mod Organizer drop-down menu (top right button) and run the game once. After that, you can manually add the “LOOT” executable to Mod Organizer.
- Unzip the loot.7z file to
~/Games/Skyrim/Modding Tools/LOOT/ - Select the drop-down menu to the left of the Mod Organizer Run button and select “Edit”
- In “Title” enter “LOOT”.
- In “Binary” - click the “…” button and navigate to your unzipped LOOT folder in
~/Games/Skyrim/Modding Tools/LOOT/ - Select “LOOT.exe” and Open.
- Finally, press the ADD button.
- When you want to run LOOT, simply select it from the Mod Organizer drop-down menu and press Run.
You should now be able to run LOOT from within Mod Organizer from the dropdown menu to sort your plugin load order.
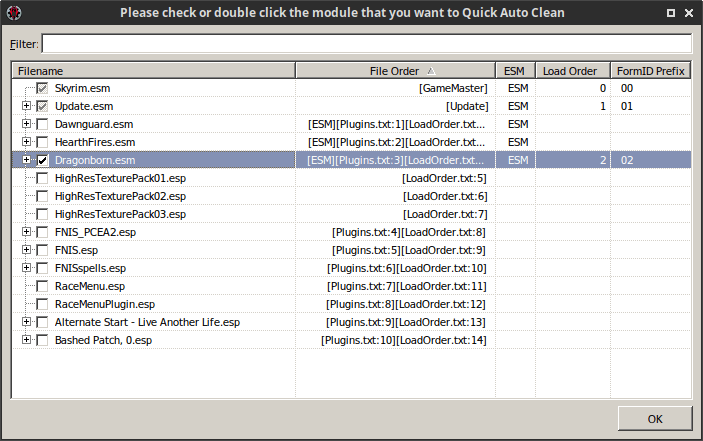
TES5Edit
TES5Edit is mostly used for cleaning “dirty plugins”. These are plugins that may cause issues further on in your gameplay and cause your save game files to be corrupted. Later versions of TES5Edit have added a “QuickAutoClean” function to make cleaning mods less painful. Let’s add “TES5Edit” with “QuickAutoClean” to “Mod Organizer”.
- Unzip the “TES5Edit.zip” file you downloaded from NexusMods.
- Copy the unzipped TES5Edit folder to your
~/Games/Skyrim/Modding Tools/folder - Select the drop-down menu to the left of the “ModOrganizer” Run button and select “Edit”
- In “Title” enter “TES5Edit QAC”.
- In “Binary” - click the “…” button and navigate to your “TES5Edit 4_0_2” folder.
- Select “TES5EditQuickAutoClean.exe” and open.
- Finally, select the ADD button.
- When you want to run Tes5Edit, simply select it from the drop-down menu and press Run.
For information on how to clean dirty plugins see here.
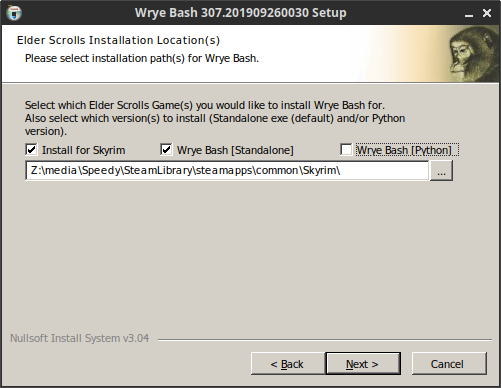
Wrye Bash
"Wrye Bash" can be used as a modding tool for Skyrim all by itself, But most people use it to create “bashed patches” for use with “Mod Organizer”.
A tutorial on creating “bashed patches” can be found here,
Installing Wrye Bash into the Skyrim game folder,
- Unpack the “Wrye Bash 307 Beta 4 - Installer-1840-307-beta4-1569537255.7z”
- In terminal type,
1protontricks 72850 -q --gui
- “Select the default wineprefix” and press “OK”.
- Select “Run uninstaller”,
- When the “Add/Remove Programs” window pops up choose “Install”
- Locate the “Wrye Bash 307 Beta 4 - Installer.exe” file and install it to your Skyrim game folder.
To use Wrye Bash with Mod Organizer:
- In Mod Organizer - select the drop-down menu to the left of the “ModOrganizer > Run” button and select “Edit”
- In Title enter “Wrye Bash”.
- In “Binary” - click the … button and navigate to your “Wrye Bash” folder. (This is normally named “Mopy” in the Skyrim game folder.)
- Select “Wrye Bash.exe” and open.
- Finally, select the ADD button.
- When you want to run Wrye Bash, simply select it from the drop-down menu and press Run.

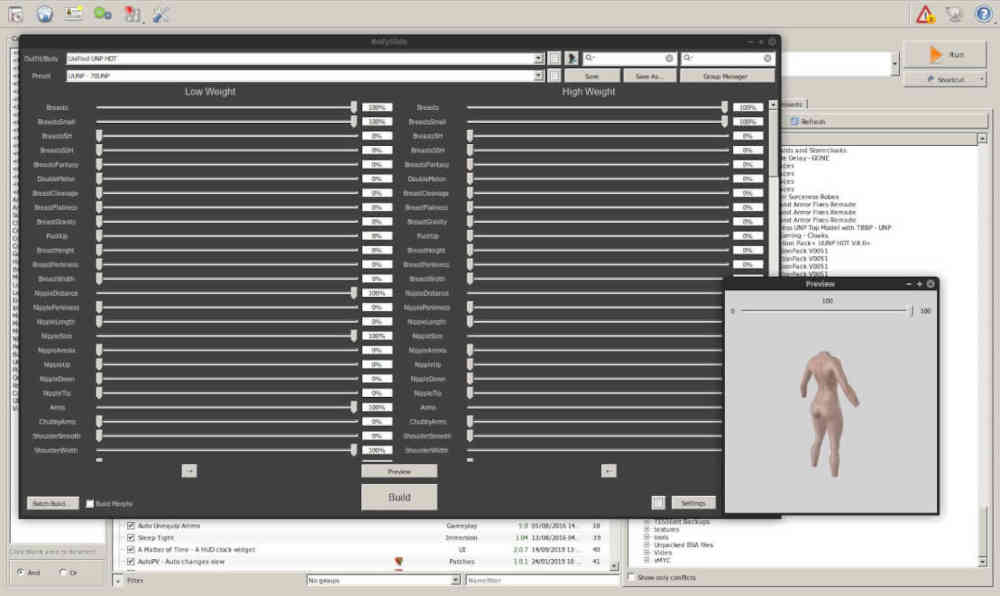
Body Slide And Outfit Studio
"An easy-to-use tool to customise bodies and outfits, creating new bodies and outfits, and converting outfits between body types."
I don't have much experience with this tool, Although, I have managed to install it and get its features functioning in the game. The in-game "Race Menu - UUNP MORPHS" do work, as does the tool itself when launched from within Mod Organizer.
To install it Body Slide in Mod Organizer:
- Download the “manual download” mod here.
- In Mod Organizer, select the "Install new Mod from archive" button. (top left)
- Locate the "BodySlide and Outfit Studio - v4.8.0-49015-4-8-0-1569154259.7z" file and install the mod with Mod Organizer, then activate the mod.
- In Mod Organizer, go to the tabs on the right side of the window and click the "Data" tab > scroll down to "CalienteTools" and expand the subdirectory to find "BodySlide" > "BodySlide.exe"
- Right click on this file and select "Add as Executable".
For a brief tutorial on how to use Body Slide in Skyrim you can view this video here. (If you know of a better video tutorial for this, please let me know.)
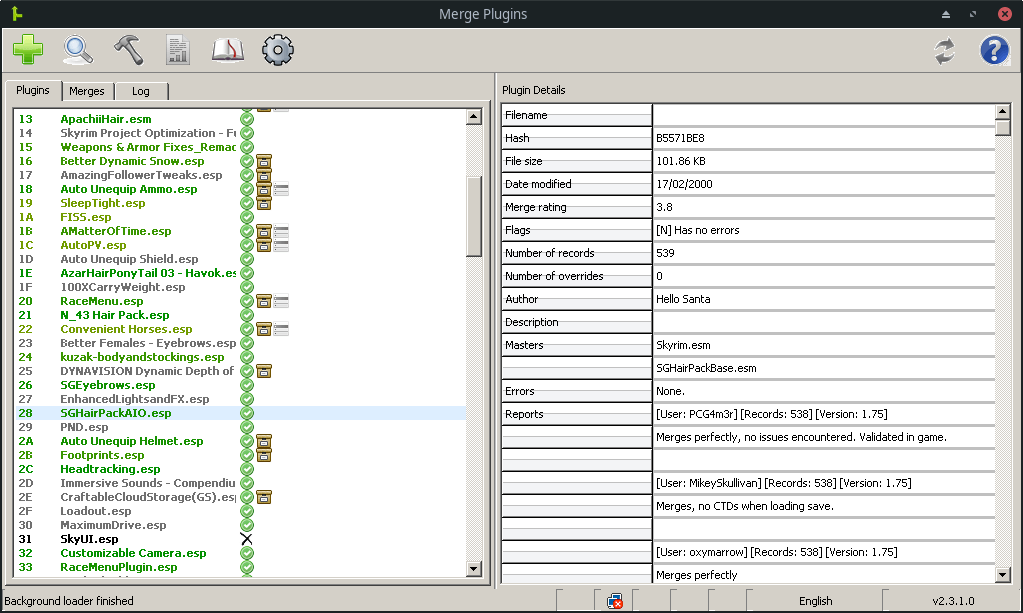
Merge Plugins
Skyrim has a hard limit of how many plugin files you can use in your load order. That value is set at 255 files maximum. If you have more than this many .esm or .esp files in your load order, Skyrim will not run.
However, with the Merge Plugins tool, you can merge many mods together into a single .esp file, thus reducing your plugin count and allowing the installation of many more mods.
A guide to using Merge Plugins can be found here.
To install Merge Plugins in ModOrganizer:
- Download the latest Merge Plugins tool from Nexus.
- Right-click on the "Merge Plugins-69905-2-3-1.zip" file in your Downloads folder and Extract here.
- Copy the extracted Merge Plugins folder to your
~/Games/Skyrim/Skyrim_Mod_Tools/folder. - Back in Mod Organizer - select the drop-down menu to the left of the “ModOrganizer > Run” button and select “Edit”
- In Title enter “Merge Plugins”.
- In “Binary” - click the … button and navigate to your “Merge Plugins” folder.
- Select “MergePlugins.exe” and open.
- Finally, select the ADD button.
When you want to run Merge Plugins, simply select it from the drop-down menu and press Run.
Mator Smash
"Mator Smash is a tool that generates conflict resolution patches, similar to Wrye Bash's Bashed Patch." This tool helps to fix issues when multiple mods modify the same records in the game. It generates a "smashed patch.esp" file, which you can place at the end of your load order to fix plugin conflicts.
- Mator Smash video guide.
To install Mator Smash in ModOrganizer:
- Download the latest Mator Smash tool from Nexus.
- Right-click on the “Mator Smash Hotfix 2-90987-1-0-2.zip” file in your Downloads folder and Extract here.
- Copy the extracted Mator Smash folder to your
~/Games/Skyrim/Skyrim_Mod_Tools/folder. - In Mod Organizer - select the drop-down menu to the left of the “ModOrganizer > Run” button and select “Edit”
- In Title enter “Mator Smash”.
- In “Binary” - click the … button and navigate to your “Mator Smash” folder.
- Select “MatorSmash.exe” and open.
- Finally, select the ADD button.
When you want to run Mator Smash, simply select it from the drop-down menu and press Run.
Common Issues
Skyrim Hangs on Exit
Type this command into your terminal once, so it gets saved to the history. This will help you quit Skyrim if it gets stuck on exiting the game.
1ps -ef |grep TESV|grep -v grep|awk '{print $2}'|xargs kill
If Skyrim fails to close correctly, Alt-Tab to your terminal and press the up arrow and run the command above to kill the process.
Xbindkeys
You can save yourself a step, by setting this command as a hotkey with “xbindkeys”
1sudo apt install xbindkeys
2xbindkeys -d
Navigate to your Home folder and Press Ctrl H to see hidden files. Look for .xbindkeysrc
Open this file with a text editor and add,
1# Kill Skyrim process.
2"ps -ef |grep TESV|grep -v g^Cp|awk '{print $2}'|xargs kill"
3Control+Alt+Mod2 + Scroll_Lock
Save the changes. You can now use the Ctrl-Alt-ScrLk key combination to kill the Skyrim process if it hangs on exiting.
In-Game Tips
My Character Can’t Sprint In-game!
Skyrim running on Linux can cause a strange bug which prevents your character from being able to run sometimes.
- Go to the game settings - Controls and note the key map for the Toggle Walk/Run button.
- Hold down the toggle walk/run button which your game is set to in the options for 2 – 4 seconds.
- Press the walk/run toggle button, then talk to an NPC.
If you have an issue with “sticky keys” preventing your character from moving correctly, do this in terminal before starting the game,
1xset -r
After quitting the game don’t forget to reset the option with,
1xset r
You could also add these commands to the top and bottom of your “ModOrganizer.sh” script if you wish to automate it. Here is how I did it,
 1#!/bin/bash
 2# "Supa's Skyrim / Mod Organizer Run Script". v0.00.031 Last Updated on 30/08/2021.
 3# This script is for use with the original "The Elder Scrolls V: Skyrim" only, not the later "The Elder Scrolls V: Skyrim Special Edition".
 4# *IMPORTANT* leave WINEESYNC=0 to the stop game heavy stuttering when moving your mouse.
 5STEAM_CLIENT="$HOME/.steam/steam"
 6# Replace with the path to your Skyrim game folder if it isn't in the default Steam library install location.
 7SKRIM_INSTALL_PATH="/media/Speedy/SteamLibrary/steamapps/common/Skyrim"
 8#
 9MOD_ORGANIZER_EXECUTABLE="/media/Speedy/GAMES/Skyrim_Mod_Tools/ModOrganizer/ModOrganizer.exe"
10cd $SKRIM_INSTALL_PATH
11# Start steam as background process and allow Mod Organizer to run after it.
12nohup steam -tcp &
13notify-send -i "/usr/share/icons/gnome/22x22/categories/applications-games.png" "Loading Steam & Mod Organizer..."
14sleep 10
15# Fix Skyrim sticky keys problem
16xset -r
17# Run the command declared earlier in DEF_CMD variable.
18DEF_CMD=$MOD_ORGANIZER_EXECUTABLE
19# Ensure that "WINEESYNC=0" to stop mouse stuttering."
20# ^^^^^^^^^^^^^^^^^^^^^^^^^^^^^^^^^^^^^^^^^^^^^^^^^^^^^^^^^^^^^^^^^^^^^^^^^^^^^^^^^^^^^^^^^^^^^^^^^^^^^^^^^^^^^
21PATH="$HOME/.local/share/Steam/steamapps/common/Proton 4.11/dist/bin/:$HOME/.local/share/Steam/ubuntu12_32/steam-runtime/amd64/bin:$HOME/.local/share/Steam/ubuntu12_32/steam-runtime/amd64/usr/bin:$HOME/.local/share/Steam/ubuntu12_32/steam-runtime/usr/bin:$HOME/.local/bin:/usr/local/bin:/usr/bin:/bin:/usr/local/sbin:/opt/cuda/bin:/opt/cuda/nsight_compute:/opt/cuda/nsight_systems/bin:/usr/lib/jvm/default/bin:/usr/bin/site_perl:/usr/bin/vendor_perl:/usr/bin/core_perl:/var/lib/snapd/snap/bin:$HOME/.scripts:$HOME/.my-doom-emacs/bin:$HOME/.config/rofi/bin" \
22	TERM="xterm" \
23	WINEDEBUG="-all" \
24	WINEDLLPATH="$HOME/.local/share/Steam/steamapps/common/Proton 4.11/dist/lib64//wine:$HOME/.local/share/Steam/steamapps/common/Proton 4.11/dist/lib//wine" \
25	LD_LIBRARY_PATH="$HOME/.local/share/Steam/steamapps/common/Proton 4.11/dist/lib64/:$HOME/.local/share/Steam/steamapps/common/Proton 4.11/dist/lib/:$HOME/.local/share/Steam/ubuntu12_32/steam-runtime/pinned_libs_32:$HOME/.local/share/Steam/ubuntu12_32/steam-runtime/pinned_libs_64:/opt/cuda/lib64:/opt/cuda/nvvm/lib64:/opt/cuda/extras/CUPTI/lib64:/usr/lib/libfakeroot:/usr/lib32:/usr/lib/opencollada:/usr/lib/openmpi:/usr/lib:$HOME/.local/share/Steam/ubuntu12_32/steam-runtime/lib/i386-linux-gnu:$HOME/.local/share/Steam/ubuntu12_32/steam-runtime/usr/lib/i386-linux-gnu:$HOME/.local/share/Steam/ubuntu12_32/steam-runtime/lib/x86_64-linux-gnu:$HOME/.local/share/Steam/ubuntu12_32/steam-runtime/usr/lib/x86_64-linux-gnu:$HOME/.local/share/Steam/ubuntu12_32/steam-runtime/lib:$HOME/.local/share/Steam/ubuntu12_32/steam-runtime/usr/lib:/media/Speedy/SteamLibrary/steamapps/common/Skyrim" \
26	WINEPREFIX="/media/Speedy/SteamLibrary/steamapps/compatdata/72850/pfx/" \
27	WINEESYNC="0" \
28	SteamGameId="72850" \
29	SteamAppId="72850" \
30	WINEDLLOVERRIDES="steam.exe=b;mfplay=n;dxvk_config=n;d3d11=n;d3d10=n;d3d10core=n;d3d10_1=n" \
31	STEAM_COMPAT_CLIENT_INSTALL_PATH="$HOME/.local/share/Steam" \
32	"$HOME/.local/share/Steam/steamapps/common/Proton 4.11/dist/bin/wine" steam.exe "${@:-${DEF_CMD[@]}}"
33
34# ^^^^^^^^^^^^^^^^^^^^^^^^^^^^^^^^^^^^^^^^^^^^^^^^^^^^^^^^^^^^^^^^^^^^^^^^^^^^^^^^^^^^^^^^^^^^^^^^^^^^^^^^^^^^^
35# When finished playing set key settings back to normal by exiting Mod Organizer and closing Steam manually.
36# *Note this will stay unset if you close the terminal, so close Mod Organizer first before you close the terminal after playing.
37xset r
38notify-send -i "/usr/share/icons/gnome/22x22/categories/applications-games.png" "Keyboard settings restored."
39echo "I used to be a Linux adventurer like you, but I took an arrow to the knee!"
40# Done
Editing Skyrim Config Files
One of the biggest annoyances when modding Skyrim, is having to edit config files to add or remove settings to suite your system. This can include having to edit the "skyrim.ini", "skyrimprefs.ini", "enblocal.ini". Constantly navigating to each of the files and opening them in a text editor can become laborious.
While Mod Organizer has a text edit function to allow you to do this, the program only opens the two main Skyrim config files in notepad. So, to make life easier for yourself, track the changes you've made or revert edits - consider using a Linux application called "Meld".
Meld allows you to see the differences between two files. And it is ideal for editing Skyrim config files.
1sudo apt install meld
Managing Config File Edits With Meld
- Create a
configs_backupfolder in your Mod Organizerprofilesfolder. - Copy the "skyrimprefs.ini", "skyrim.ini" and (if you use it) the "enblocal.ini" file into this folder.
- Launch Meld and select the "File comparison" button and select one of the ".ini" files in the "configs_backup" folder.
- Press the Compare button and navigate to the working copy of the similarly names ".ini" file you want to edit.
- As you make changes to the right side document, you can view the changes from the original file on the left.
- This will help you easily revert any edits that may not have worked for you, rather than having to remember what you changed after long play sessions.
Example: You want to make an edit the "enblocal.ini" file in the Skyrim folder. However, if a change crashes your game, you'll want to revert those changes.

ENB?
I’m still working on how to get this going. If anyone has any tips they would like to share on getting ENB working in Skyrim on Linux, I’d be very grateful. For the time being, I'd recommend a mod called "IMAGINATOR - Visual Control Device for Skyrim"” as an alternative option, for those who don’t wish to use ENB or can not get it to work on Linux. I use this in conjunction with a few other mods called "I Can't Believe Its Not ENB" , "Climates of Tamriel - Weather - Lighting - Audio" or Enhanced lights and FX.
Conclusion
If you made it this far, you should now have a working modding environment for Skyrim. While this guide covers setting up the modding environment for Linux, adding mods to the game is a separate tutorial all in itself. Each person will have their own distinct mod requirements, therefore it’s not covered here. For information on adding mods to the game via ModOrganizer, I’d recommend looking at the many YouTube tutorials out there. This document will be updated if anything changes in the future.
For any additions or corrections to this guide, your feedback is always welcome.
I hope this helps. -Supa 😃
Useful Links
S.T.E.P Wiki https://stepmodifications.org/wiki/SkyrimLE:3.0.0
Mod Sites
Nexus Mods https://www.nexusmods.com/skyrim
ModDB https://www.moddb.com/games/skyrim/mods
Lovers Lab https://www.loverslab.com/(NSFW)
mitakusaner http://mitakusaner.blog.fc2.com/archives.html (Female Armour / NSFW)
Halo’s Mods http://mod.dysintropi.me/mods/skyrim/
Modding Guides
GamerPoets https://www.youtube.com/user/gamerpoets/playlists?view=50&sort=dd&shelf_id=10
Gopher https://www.youtube.com/playlist?list=PLE7DlYarj-DdhDG41roBVJfNCqvO5MmKP
