Awesome Window Manager: Part 2
On of many things I love about Linux, is that fact that you can change almost everything about the OS. Unlike Mac or Windows where you're forced to use the graphical user interface which comes with the OS - Linux allows unparalleled flexibility and freedom when it comes to customization.
Installing and learning how to configure a window manager is just one of the ways to experience this first hand.
Initially, I wrote this guide to help a friend of mine who has recently started using Linux, and who wanted to use the same setup which I use. If you are new to Linux and this helps you too — then that's great, and I'm happy to share this with you. -Supa 👍
About
In part one of this guide, we looked at,
- what a window manager is,
- who would benefit from using one,
- the advantages of using a window manager over a traditional desktop,
- a preview of my current configuration.
In this guide, I'll show you how to install and configure the "Awesome" Window Manager alongside a Manjaro Xfce installation. We'll then make edits to the default configuration and install a third-party theme.
Setting up and customizing a window manager for the first time can be quite extensive. At first glance, it may seem like an impossibly laborious task. However, you only have to do it once, you can work at your own pace, and once it's complete, you can use this same configuration on any Linux distribution you choose to use in the future.
This will be quite a lengthy guide, split into different parts, covering most of the things you'll need to do and how to do it. I'll try to keep each segment brief, concise and digestible. (So you don't fall asleep!) 🙂
With that out of the way, if you haven't already - grab some snacks and your favourite beverage and let's get started.
Before You Begin
This guide assumes that you,
- are running Manjaro Linux Xfce,
- know how to navigate your file system,
- are comfortable editing text files,
- are able to install and remove apps via the terminal using "pacman" and "yay",
- have performed a recent system backup using Timeshift,
- have access to another pc, smartphone or tablet to follow along with this guide.
Installing Awesome WM
Installation of "Awesome" on Manjaro is quite simple. Open a terminal and type:
1sudo pacman -S awesome
After installing it, you probably won't notice anything different. That's because "AwesomeWM" isn't a desktop environment like KDE, Mate or Gnome, which would normally conflict with your existing Xfce installation - so you won't break anything after you install it. Its only job is to provide you with a tiling window manager. Meaning, when you open apps, it will automatically place the windows in a convenient tiled layout on your screen. Hence, the name, "tiling window manager". 😉
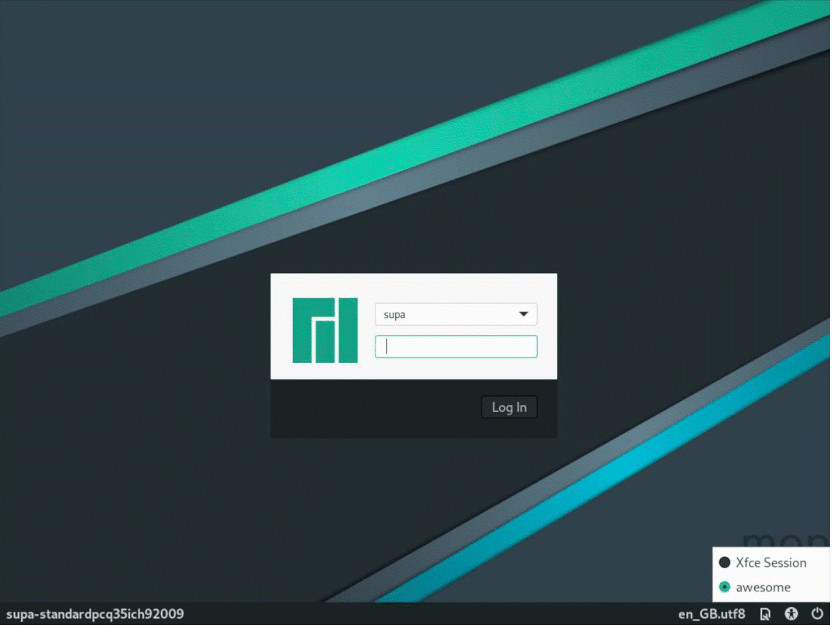
Logging In
To log into awesome, you'll need to log out of your Xfce session and select awesome from your LightDM session login screen (bottom right). Then log in.
This would be a good time to load up this guide on your smartphone or tablet to follow along.
A Brief Overview
After logging in, you'll be presented with a minimal black screen, with what appears to be very little options to do anything. You're probably looking at this boring black screen and thinking, "What the heck! This is worse than what I have now!". However, don't be deceived, as behind that basic black desktop is your doorway to make your OS look and feel exactly the way you want it. Gone are the days of playing "whack-a-mole", left-clicking on icons and widgets to open and close windows, from here on out, it's mostly going to be hotkeys.
Help!
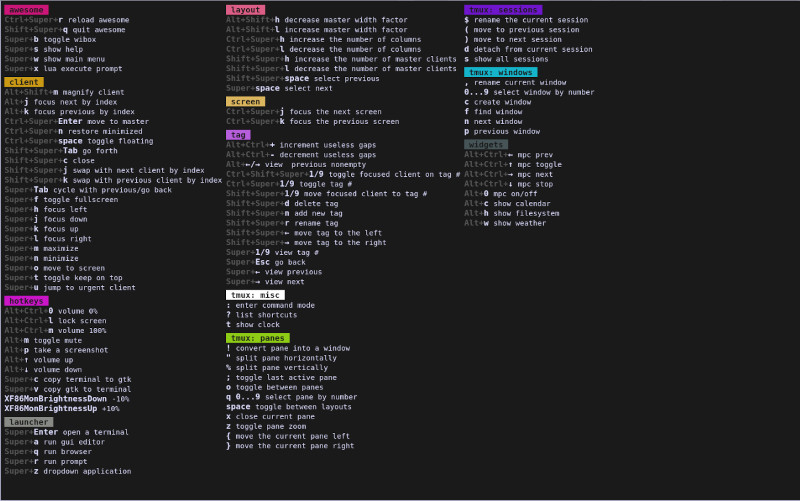
You're probably clicking like mad at this point all over the screen, wondering where all your apps have gone or how to even do anything. Don't worry, as Awesome comes with a convenient little hotkeys popup. If you press Super + s this provides you with all the hotkeys in one convenient window.
You don't have to memorize all of these, only the ones you use the most.
Hotkeys
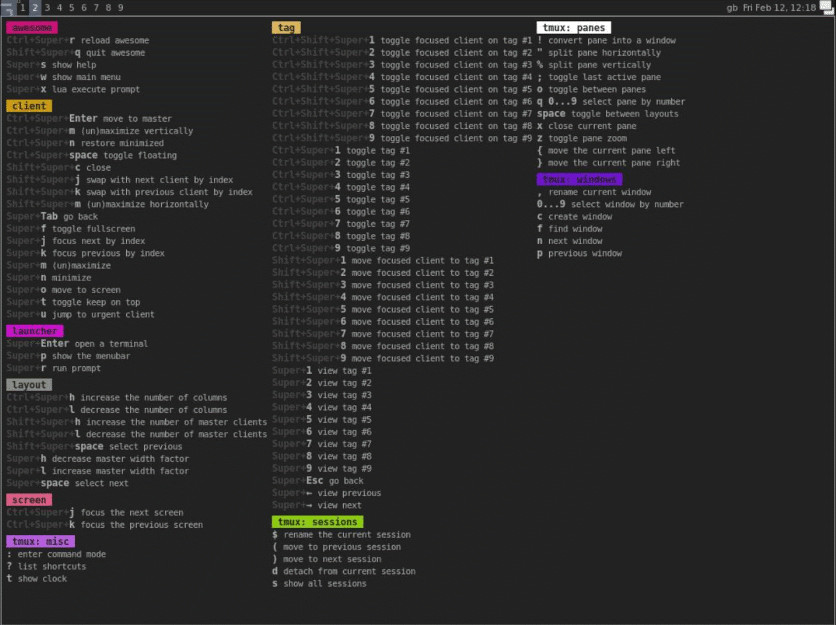
| Action | Hotkey | |
|---|---|---|
| Quit awesome | [Super + Shift + q] | |
| Reload awesome | [Super + Ctrl + r] | |
| Cycle Tiling Layout | [Super + Shift + Space] | |
| Show Help | [Super + s] | |
| Open Terminal | [Super + Return] | |
| Run Prompt | [Super + r] | |
| Show Menu Bar | [Super + p] | |
| Close Window | [Super + Shift + c] | |
| Move To Tag | [Super + 1 - 9] or [Super + Left/Right Arrow] | |
| Move Focused to tab | [Super + Shift + 1 - 9] | |
| Open Menu | [Super + w] or [RMB] | |
| Toggle Fullscreen | [Super + f] | |
| Minimize Window | [Super + n] | |
| Unminimize Window | [Super + Ctrl + n] | |
| Maximize Toggle | [Super + m] | |
| Move Floating Window | [Super + LMB] (drag mouse) | |
| Resize Floating Window | [Super + RMB] (drag mouse) | |
| Move To Previous Tag | [Super + Esc] |
The Panel
Wibar
At the top of the screen you can see the Awesome taskbar or "wibar". This is the place where you'll find tabs, window names, a clock and other widgets.

Menu
In the top left corner, you'll notice a funny-looking icon. This is the menu button. You can left-click it, and it will list options to launch a terminal and edit the Awesome config file. You can also open the menu by pressing Super + w. By default, it's unpopulated, with minimal options to do anything at the moment. However, you can configure it to display all your installed apps and anything else you may wish to add to it. You probably won't use this menu that often, as most of the apps you'll launch will be with hotkeys. I've actually disabled the menu icon in my configuration.
Tabs
Next to the menu button in the top left of the screen, you'll notice a bunch of numbers labelled from 1 to 9. These are called tabs. Think of tabs like virtual work spaces. You can open your apps on whatever tab you're currently on and each app window will be placed neatly next to other windows which you already have open. You can move windows to different tabs or screens using the awesome hotkeys. Using tabs avoids the need to minimize and maximize windows and will save you a lot of time while you work.
- You can cycle through tabs by pressing
Super + Left/Right, or go directly to a tab number by pressingSuper + 1to9. - You can scroll your middle mouse button over the tabs list to cycle through the tab numbers.
- If you have individual apps open on separate tabs, you can bring them into focus on the same screen by pressing the
Right Mouse Buttonon tab numbers.
Note how the tab numbers are highlighted with a different colour when you select a tab. This is to show you that you are currently on that tab. If you see a star near the top left of the tab number, this means that you have apps running on that tab. Tabs with no star are empty.
Widgets
In Awesome, you can write your own code to add widgets to the "wibar". This is very useful if you need to create a button to perform a simple task. Most themes come with widgets preconfigured, and you can enable or disable these at your leisure. Commonly found widgets are: clock, calendar, weather, network traffic, memory, CPU temperature, volume control and music.
Layout
At the top far right of the screen, you can see the window layout icon. This displays the windowing layout currently in use. If you left-click it, or scroll your middle mouse button over it, you can toggle the window layouts. You can cycle through available layouts by pressing, Super + Shift + Space. Notice how the layout icon changes to reflect the one which is active. By hovering your mouse over the widget, you can see the layout name appear.
Configuration
Now that we've had a quick look over the Awesome screen, you're probably itching to "slap some lipstick" on this thing and make it look beautiful! Before we do that, we need to understand how awesome works by looking at its configuration file.
Getting Started
The first thing you'll want to do is to make the awesome environment usable. This means setting up some hotkeys for some basic apps like a text editor and a terminal.
To open a terminal in awesome, you'd normally press Super + Return. However, you'll notice that if you try this - nothing happens. This is because by default the Awesome configuration file has the key binding for opening a terminal set to use xterm by default. Manjaro doesn't ship with xterm out of the box, so you'll have to edit the awesome config file rc.lua and change the key binding to use the xfce4-terminal instead.
- Press
Super + pand typeTerminal, then press Enter.
In the Xfce terminal, copy the default awesome config file to ~/.config/awesome/. Then we can start making edits to the configuration:
1cd
2mkdir .config/awesome
3cp /etc/xdg/awesome/rc.lua ~/.config/awesome/rc.lua
Now press Super + Ctrl + r to reset awesome and have it use the config file we just copied into the Home folder.
Awesome Config File
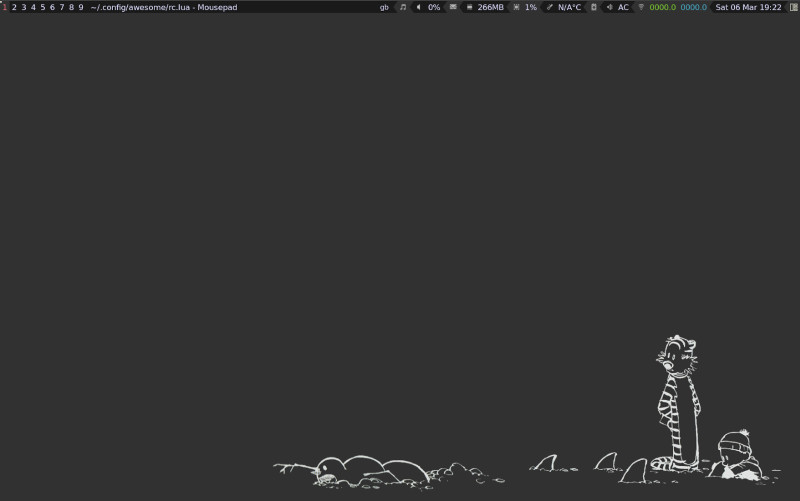
Again from the terminal - launch the mousepad editor, so we can take a look at the rc.lua config file:
1mousepad ~/.config/awesome/rc.lua
From here we can make some edits and change xterm to xfce-terminal to be the default terminal for Awesome.
Before you do anything else, enable "Line Numbers" in mousepad from the "View" menu option. This will be helpful to follow along with the guide.
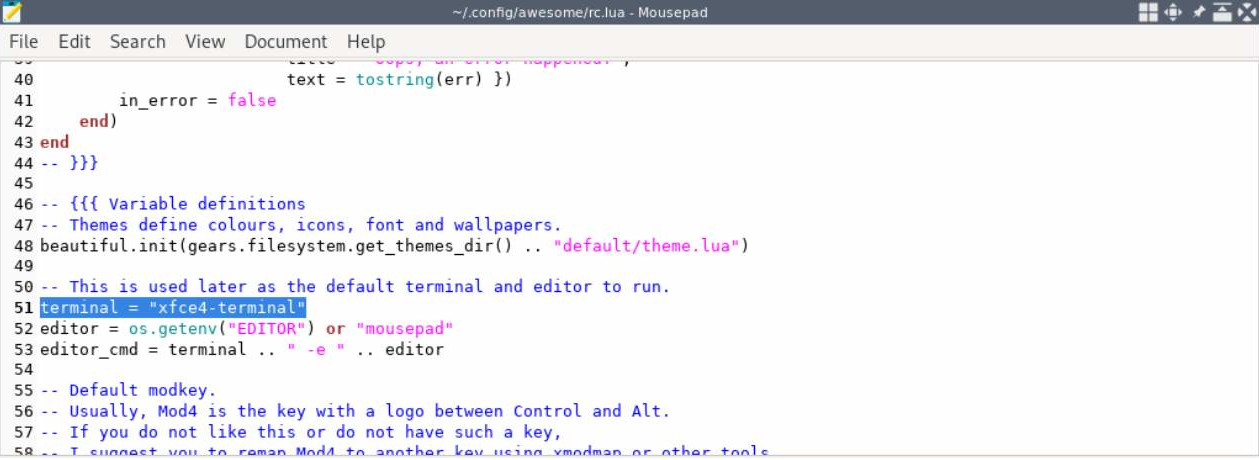
Looking at the main configuration file for awesome, you may feel totally lost as to what is going on. It's all written in the Lua language, and it controls everything Awesome does. However, with a bit of patience and basic scrutiny, even non programmers can figure out what it's doing. For the more adventurous, you can take a deeper dive into the awesome config file by following this link.
Scrolling through the config file, you'll see lots of variables and commands which specify the actions for Awesome. Over time you'll figure out what all this stuff does. However, the first thing you need to do is get a terminal mapped to a hotkey.
:memo: Be careful to not change random lines of code without knowing what they do or how the syntax is formatted. If you forget what edits you've made, you could break your configuration, and you'll see red error message when you reset Awesome. If you do manage to accidentally break things, you can simply copy the default config from etc/xdg/awesome/rc.lua back into .config/awesome/rc.lua as we did earlier.
On line 51, you can see that the terminal awesome looks for by default is "xterm", however, we don't have this installed by default on Manjaro, so let's replace the string "xterm" on line 51 with "xfce4-terminal", then save the file.
Reset Awesome
Each time you make changes to the configuration file - in order for those changes to take effect, you'll need to reset Awesome.
You can do this easily by pressing Super + Ctrl + r
Congratulations! You just made your first edit to the Awesome configuration file. Press Super + Return, you should now be able to launch a terminal.
Awesome Themes
You've just seen a small example of how you'd make edits to the rc.lua configuration file. Each time you wish to change something about the way Awesome works, you'll be editing this file a lot.
The default configuration file and theme which comes with awesome is usable, however there are third-party themes online which we can use to save a lot of time editing lines of code. We'll install one named, "awesome-copycats" and replace the existing configuration file we've just looked at. We can then make modifications to that theme and customize it further.
Installing
The following commands will download the "awesome-copycats" theme from GitHub, move the contents of the theme folder into your Awesome config folder, then remove the original download folder.
Open a terminal and enter:
1git clone --recursive https://github.com/lcpz/awesome-copycats.git
2mv -bv awesome-copycats/* ~/.config/awesome && rm -rf awesome-copycats
Ensure to follow the next steps in sequence.
- Press
Super + pand type thunar and pressReturnto open the "Thunar" file manager. - In Thunar, press
Ctrl + hto show hidden files, - Navigate to the
~/.config/awesome/folder, - Rename
rc.luatodefault-rc.lua - Rename
rc.lua.templatetorc.lua - Open the new
rc.luaconfig file with Mousepad
Theme Configuration
We're now going to make some small edits again to rc.lua, to set a theme style, default terminal & apps, and add additional tag numbers.
Change the theme to "powerarrow-dark", edit line 89 and edit to:
1local chosen_theme = theme[7]
Set the default terminal, on line 92:
1local terminal = "xfce4-terminal"
Set favourite text editors, edit from line 95:
1local editor       = os.getenv("EDITOR") or "nano"
2local gui_editor   = os.getenv("GUI_EDITOR") or "mousepad"
To add additional tags, edit line 101 to:
1awful.util.tagnames = {"1", "2", "3", "4", "5", "6", "7", "8", "9"}
To disable "floating windows" as a window layout, on line 103, precede the code on that line with double-dash --:
1--awful.layout.suit.floating
Hide titlebars on windows, edit line 693:
1properties = { titlebars_enabled = false } },
Once all that is done, save the changes to your rc.lua and reset Awesome by pressing Super + Ctrl + r
You should now see that the Awesome theme has changed to "powerarrow-dark" as defined in the config file. Pressing Super + s we can view the hotkeys for this theme. You'll notice that there are a lot of hotkeys listed.
Enable/Disable Code
As you make edits to your configuration file, there will be certain times when you'll want to add or remove lines of code. Rather than completely removing them, you can comment out lines of code.
For example, one of the first things I did after installing this theme was to hide the "tmux" hotkeys from being shown in the hotkey helper window. I don't need to see these since I don't use tmux, and it can make the hotkey helper window look a little crowded.
At the top of the script, I added this line of code to prevent the tmux hotkeys being shown:
1-- "Remove tmux hotkeys from hotkey helper."
2package.loaded["awful.hotkeys_popup.keys.tmux"] = {}
The double-dashes -- at the beginning of a line mean that a line is a commented out. You can use this to describe blocks of code which you may add at a later date. This will help you keep track of changes.
Save the file and restart Awesome Super + Ctrl + r
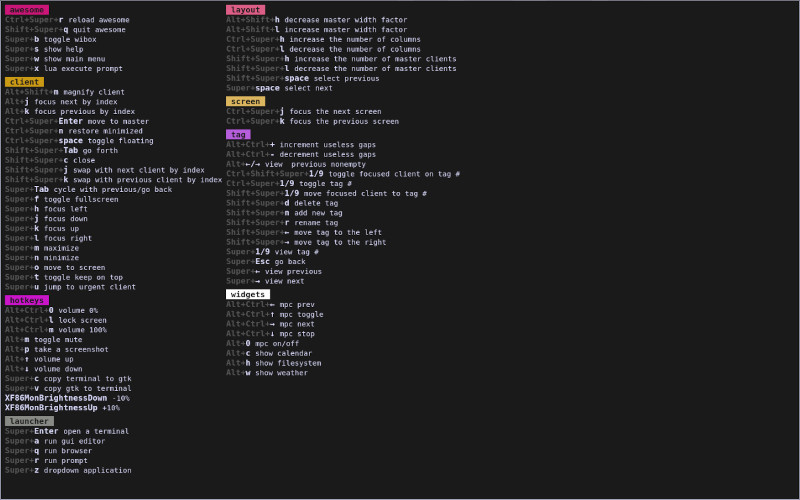
Notice that when you view your hotkeys, Super + s, the tmux keys are now hidden. If you wish to disable this function in the future, you can disable a code block by adding a --[[ and --]] at the top and bottom.
Like this:
1--[[
2-- "Remove tmux hotkeys from hotkey helper."
3package.loaded["awful.hotkeys_popup.keys.tmux"] = {}
4--]]
This concludes part two of this guide.
Before you go, I'd recommend joining the r/awesomewm subreddit. You can find a lot of cool tips and tricks from the people who use Awesome. They often solve problems and share ideas on new features.
In the next part, we'll look at how to add a "run launcher", how to autostart applications and applets when Awesome starts up, and how to add hotkeys.
